System documentation and configuration details.
This section contains information about system configuration, maintenance, and administration.
This is the multi-page printable view of this section. Click here to print.
System documentation and configuration details.
This section contains information about system configuration, maintenance, and administration.
The VDAT Platform is a comprehensive healthcare data integration and management system designed to facilitate the collection, processing, and analysis of medical data across healthcare institutions. The platform provides a secure, scalable infrastructure for healthcare data interoperability, enabling improved patient care, research, and data-driven decision making.
The VDAT Platform offers several key capabilities:
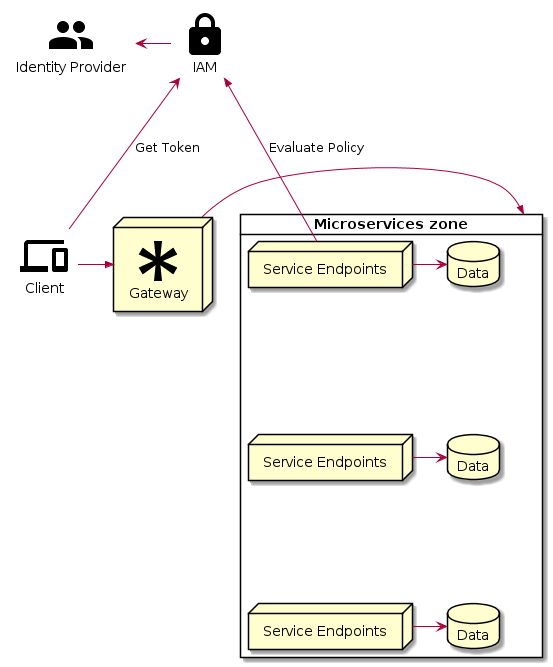
The VDAT Platform is built on a microservices architecture that emphasizes security, scalability, and interoperability. Each service is responsible for its own authentication and authorization, with support from a centralized Identity Access Management (IAM) system.

Key components include:
The VDAT Platform supports numerous healthcare use cases, including:
To learn more about specific components and capabilities of the VDAT Platform, explore the documentation sections:
hvmigrateuser được triển khai tại bệnh viện, kết nối với API Gateway của bệnh viện thực hiện đồng bộ dữ liệu hàng giờ.hvmigrateuser kết nối đến event store tại VDAT để publish event và fetch event để lấy trạng thái mới nhất khi cần.hvmigrateuser kiểm tra trạng thái của bệnh nhân tại hệ thống VDAT và thực hiện đồng bộ khi cần.hvconsumer được triển khai tại VDAT, kết nối đến event store tại VDAT fetch các event được lưu trữ trên event store và cung cấp API để truy vấn thông tin mới nhất của bệnh nhân.graph LR
hvmigrateuser[hvmigrateuser] --> API[API Gateway]
API --> HV[Hung Vuong Hospital]
hvmigrateuser --> EventStore[Event Store]
hvconsumer[hvconsumer] --> EventStore
hvconsumer --> VDAT[VDAT System]
hvmigrateuser --> VDAT
VDAT --> EventStore
classDef hospitalNode fill:#f9d5e5,stroke:#333,stroke-width:1px;
classDef serviceNode fill:#eeeeee,stroke:#333,stroke-width:1px;
classDef platformNode fill:#d5f9e8,stroke:#333,stroke-width:1px;
class HV,API hospitalNode;
class hvmigrateuser,hvconsumer serviceNode;
class EventStore,VDAT platformNode;
subgraph "Hung Vuong Hospital"
HV
API
hvmigrateuser
end
subgraph "VDAT Platform"
EventStore
hvconsumer
VDAT
end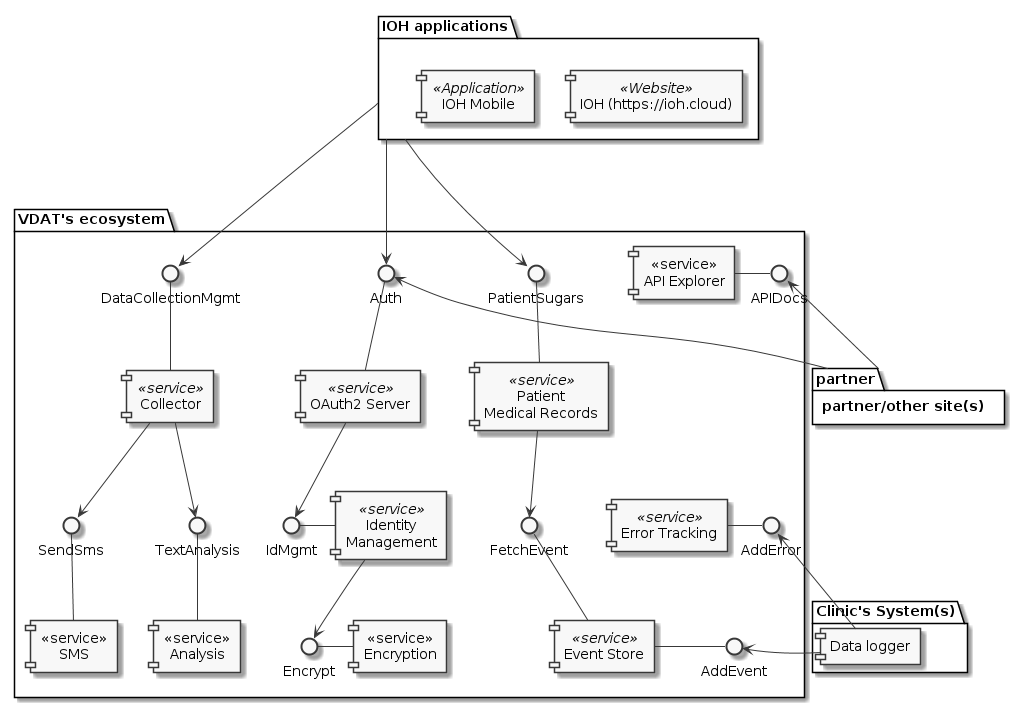
Hệ thống gồm các dịch vụ chính như:
Ngoài ra, còn có các dịch vụ:
Khi triển khai kiến trúc Microservice thông thường sẽ có hai cách hiện thực phân quyền:
Hệ thống này được hiện thực theo cách 2 - Mỗi service tự phân quyền, do đó cần có IAM để hỗ trợ các service trong việc xác thực người dùng
IAM (Identity Access Management) nắm giữ các định danh của toàn bộ các đối tượng (user, service, command…) cùng với các bộ luật phân quyền chi tiết cho từng loại tài nguyên.
Việc mỗi service phải tự thực hiện việc xác thực, phân quyền sẽ làm tăng chi phí khi xây dựng các service, ngoài các nghiệp vụ chính thì cần thêm lớp middleware để giao tiếp với IAM.
Mã nguồn tất cả các dịch vụ được lưu trữ trong các project tại GitLab.com Theo mặc định các dịch vụ sẽ được đóng thành docker image lưu trữ trên GitLab Docker Registry tại mỗi Project để chờ deploy.
Có nhiều phương thức triển khai các dịch vụ, có thể sử dụng một hoặc nhiều phương thức triển khai tùy theo dịch vụ, một số phương thức cơ bản có thể liệt kê gồm:
Môi trường triển khai này dùng cho mục đích thuyết minh (demo), phát triển (development) do đó hướng tới triển khai đơn giản, nhanh và không yêu cầu tính ổn định và khả năng chịu lỗi' Yêu cầu cần có để triển khai
Để triển khai IOH, thực hiện các bước sau theo thứ tự
Để tùy chỉnh nâng cao, xem tài liệu triển khai ở từng dịch vụ
Môi trường production sử dụng một Kubernetes Cluster, gồm ít nhất 3 master (stacked master + etcd) nhầm đảm bảo tính sẵn sàng. Cluster được liên kết với GitLab và sử dụng quy trình triển khai Auto DevOps của GitLab là quy trình mặc định để triển khai dịch vụ. Quy trình này được kích hoạt mỗi khi có thay đổi ở GitLab project, thường là ở nhánh master. Quy trình gồm các giai đoạn sau:
Sau khi triển khai lên môi trường production thành công, công việc còn lại của Operator là giám sát và điều khiển dịch vụ bằng giao diện điều khiển của Kubernetes.
Đây là sơ đồ triển khai Kubernetes Cluster với cấu hình High Available (sẵn sàng cao). Mô hình triển khai này nằm tăng tính ổn định của hệ thống, giảm thiểu khả năng tê liệt toàn bộ hệ thống khi một máy vật lý nào đó gặp lỗi hoặc máy vật lý cần tắt để thực hiện các thao tác bảo trì.
 Hệ thống trên được triển khai trong mạng nội bộ nằm phía sau tường lửa chỉ mở port 80 và 443 để nhận kết nôi trừ bên ngoài ở địa chỉ IP xác định.
Việc nhận request từ bên ngoài sẽ được đảm nhiệm bởi 02 Load Balancer cùng thay phiên nhau lắng nghe dữ liệu từ cổng công khai,
2 load balancer sẽ vận hành cơ chế health checking để kiểm tra trạng thái hiện tại lẫn nhau.
Nếu Load Balancer ở chế độ Active gặp trục trặc, thì Load Balancer còn lại đang ở chế độ Passive sẽ chuyển qua chế độ Active để lắng nghe
dữ liệu và vận hành thay thế cho Load Balancer gặp trục trặc có thời gian phục hồi.
Hệ thống trên được triển khai trong mạng nội bộ nằm phía sau tường lửa chỉ mở port 80 và 443 để nhận kết nôi trừ bên ngoài ở địa chỉ IP xác định.
Việc nhận request từ bên ngoài sẽ được đảm nhiệm bởi 02 Load Balancer cùng thay phiên nhau lắng nghe dữ liệu từ cổng công khai,
2 load balancer sẽ vận hành cơ chế health checking để kiểm tra trạng thái hiện tại lẫn nhau.
Nếu Load Balancer ở chế độ Active gặp trục trặc, thì Load Balancer còn lại đang ở chế độ Passive sẽ chuyển qua chế độ Active để lắng nghe
dữ liệu và vận hành thay thế cho Load Balancer gặp trục trặc có thời gian phục hồi.
Kubernetes Cluster được điều khiển bởi các node Master, để tăng tính ổn định ta cần scaling các node Master này lên, các node Master sẽ kết nối với nhau bằng port :6443 của Load Balancer.
Worker node là các node là nhiệm vụ xử lý chính, đây là nơi các service được triển khai vào cluster hoạt động. Tùy theo nhu cầu xử ý mà ta scale các worker node với số lượng phù hợp. Các worker node kết nối với master thông qua port 6443 của Load Balancer
TODO: Review
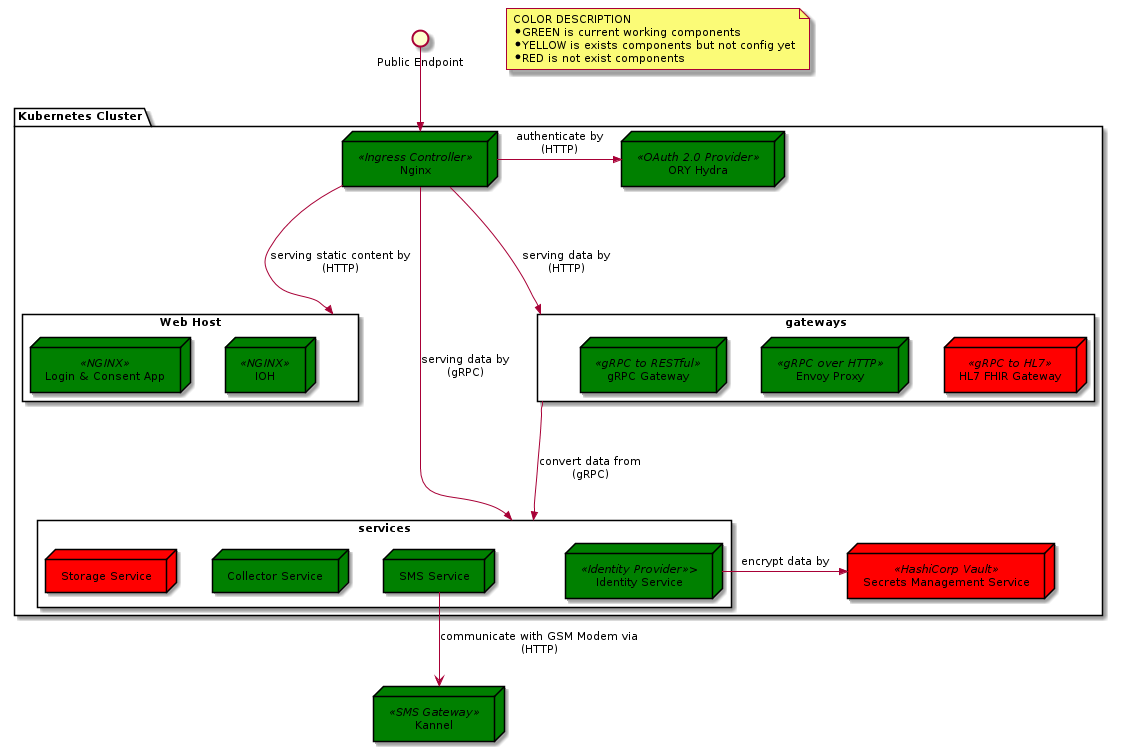
Sơ đồ thể hiện sự phân luồng dữ liệu dữ liệu đi vào hệ thống gồm loại giao thức và các thành phần tiếp nhận.
Sơ đồ liệt kê các thành phần khi triển khai hệ thống.
Các kết nối là 2 CHIỀU (request/response) chiều mũi tên là chiều request từ dịch vụ yêu cầu tài nguyên đến dịch vụ cung cấp tài nguyên, chiều ngược lại là chiều response. sơ đồ KHÔNG sử dụng kết nối 1 chiều.
Màu:
Phần này bao gồm các tài liệu về các ứng dụng và dịch vụ được triển khai trong hệ thống.
Cấu hình biểu đồ - Full docs
Cấu hình biểu đồ - Model diagram
Các tính năng của IOH phục vụ trong dự án nghiên cứu dữ liệu được chia thành 6 nhóm:
TODO Bổ sung nội dung cho sản phẩm này
Ứng dụng thu thập dữ liệu người dùng bằng biểu mẫu trên Mobile và Web


This section provides detailed instructions for setting up and configuring the infrastructure components required for the system deployment.
Install Docker runtime click here
Setup Cgroup Driver for Docker click here
 sudo mkdir /etc/docker

 cat <<EOF | sudo tee /etc/docker/daemon.json
 {
   "exec-opts": ["native.cgroupdriver=systemd"],
   "log-driver": "json-file",
   "log-opts": {
     "max-size": "100m"
   },
   "storage-driver": "overlay2"
 }
 EOF

 sudo systemctl enable docker
 sudo systemctl daemon-reload
 sudo systemctl restart docker
Turn off swap:
Install kubeadm, kubelet, kubectl: click here
Setup HA Proxy Click here
  global
    log /dev/log local0
    log /dev/log local1 notice
    chroot /var/lib/haproxy
    stats timeout 30s
    user haproxy
    group haproxy
    daemon

  defaults
    log global
    option tcplog
    mode http
    #option httplog
    option dontlognull
    timeout connect 10s
    timeout client 30s
    timeout server 30s

  # list server is configure in nginx controller externalIPs
  listen lets-encrypt-http-resolver2
    bind *:80
    mode http
    maxconn 8
    stats uri /haproxy?stats
    balance roundrobin
    server v127 192.168.0.127:80 check fall 3 rise 2 check-send-proxy inter 10s send-proxy

  # list server is configure in nginx controller externalIPs
  listen k8s-nginx-ingress
    bind *:443
    mode tcp
    maxconn 10000
    timeout tunnel 600s
    balance roundrobin
    option tcp-check
    server v127 192.168.0.127:443 check fall 3 rise 2 check-send-proxy inter 10s send-proxy

  # list server  master node
  listen k8s-api-server
    bind *:7443
    mode tcp
    timeout connect 5s
    timeout client 24h
    timeout server 24h
    server v117 192.168.0.117:6443 check fall 3 rise 2
    server v118 192.168.0.118:6443 check fall 3 rise 2
    server v119 192.168.0.119:6443 check fall 3 rise 2
Setup Keepalived Click here
  ens160: flags=4163<UP,BROADCAST,RUNNING,MULTICAST>  mtu 1500
    inet 192.168.0.117  netmask 255.255.255.0  broadcast 192.168.0.255
    inet6 fe80::20c:29ff:fe6a:941c  prefixlen 64  scopeid 0x20<link>
    ether 00:0c:29:6a:94:1c  txqueuelen 1000  (Ethernet)
    RX packets 1157858  bytes 430863324 (430.8 MB)
    RX errors 0  dropped 0  overruns 0  frame 0
    TX packets 1036082  bytes 186847619 (186.8 MB)
    TX errors 0  dropped 0 overruns 0  carrier 0  collisions 0
  global_defs {
    enable_script_security
    script_user root root #USER
    router_id lb01
  }
  vrrp_script chk_haproxy {
    script "/usr/bin/killall -0 haproxy"
    interval 2
    weight 2
  }
  vrrp_instance VI_1 {
    virtual_router_id 52
    advert_int 1
    priority 100 # MASTER > BACKUP: 100 > 99 > 98
    state MASTER # MASTER OR BACKUP
    interface ens160 # NETWORK INTERFACE
    unicast_src_ip 192.168.0.117 # The IP address of this machine
    unicast_peer {
      192.168.0.118 # IP address of peer
      192.168.0.119 # IP address of peer
    }
    virtual_ipaddress {
      192.168.0.200 dev ens160 # THe virual address
    }
    authentication {
        auth_type PASS
        auth_pass 1111
    }
    track_script {
      chk_haproxy
    }
  }
Verify Keepalived
ip a s ens160: <BROADCAST,MULTICAST,UP,LOWER_UP> mtu 1500 qdisc mq state UP group default qlen 1000
link/ether 00:0c:29:6a:94:1c brd ff:ff:ff:ff:ff:ff
inet 192.168.0.117/24 brd 192.168.0.255 scope global ens160
valid_lft forever preferred_lft forever
inet 192.168.0.200/32 scope global ens160
valid_lft forever preferred_lft forever
inet6 fe80::20c:29ff:fe6a:941c/64 scope link
valid_lft forever preferred_lft forever
journalctl -u keepalived.service -fCreate high available cluster
#"LOAD_BALANCER_DNS:LOAD_BALANCER_PORT"
# Add option --pod-network-cidr=10.244.0.0/16 for install Plannel CNI network
# https://github.com/flannel-io/flannel/blob/master/Documentation/kubernetes.md
sudo kubeadm init --pod-network-cidr=10.244.0.0/16 --control-plane-endpoint "192.168.0.200:7443" --upload-certs
kubeadm join 192.168.0.200:7443 --token ${token} \
    --discovery-token-ca-cert-hash ${token-ca-cert} \
    --control-plane --certificate-key ${certificate}
kubeadm join 192.168.0.200:7443 --token ${token} \
    --discovery-token-ca-cert-hash ${token-ca-cert} \
mkdir -p $HOME/.kube
sudo cp -i /etc/kubernetes/admin.conf $HOME/.kube/config
sudo chown $(id -u):$(id -g) $HOME/.kube/config
Apply CNI Plugin
kubectl apply -f https://raw.githubusercontent.com/coreos/flannel/master/Documentation/kube-flannel.yml
kubectl apply -f "https://cloud.weave.works/k8s/net?k8s-version=$(kubectl version | base64 | tr -d '\n')"
Update primary HA Proxxy: (Optional)
listen k8s-new-api-server
    bind *:8443
    mode tcp
    timeout connect 5s
    timeout client 24h
    timeout server 24h
    server p200 192.168.0.200:7443 check fall 3 rise 2 # NEW HAPROXY
Renew certificate when public cluster click here
  #UPDATE CERTIFICATE WITH EACH MASTER
  rm /etc/kubernetes/pki/apiserver.*

  kubeadm init phase certs apiserver --apiserver-advertise-address 192.168.0.200 --apiserver-cert-extra-sans 115.79.213.25

  kubeadm certs renew admin.conf
Install Rook Ceph click here
git clone --single-branch --branch v1.6.7 https://github.com/rook/rook.git
  cd cluster/examples/kubernetes/ceph
  kubectl create -f crds.yaml -f common.yaml -f operator.yaml

  # verify the rook-ceph-operator is in the `Running` state before proceeding
  kubectl -n rook-ceph get pod
kubectl create -f cluster.yaml
Intergrate Gitlab Kubernetes (Optional) click here
Install Helm Click here
curl https://baltocdn.com/helm/signing.asc | sudo apt-key add -
sudo apt-get install apt-transport-https --yes
echo "deb https://baltocdn.com/helm/stable/debian/ all main" | sudo tee /etc/apt/sources.list.d/helm-stable-debian.list
sudo apt-get update
sudo apt-get install helm -y
Install Cert-Manager Click here
kubectl create namespace cert-manager
helm repo add jetstack https://charts.jetstack.io
helm repo update
helm -n cert-manager install cert-manager jetstack/cert-manager --set ingressShim.defaultIssuerName=letsencrypt-prod --set ingressShim.defaultIssuerKind=ClusterIssuer --set installCRDs=true --version v1.4.0
# cluster-issuer-staging.yaml
apiVersion: cert-manager.io/v1
kind: ClusterIssuer
metadata:
  name: letsencrypt-staging
spec:
  acme:
    email: master@vdatlab.com
    server: https://acme-staging-v02.api.letsencrypt.org/directory
    privateKeySecretRef:
      name: letsencrypt-staging
    solvers:
    - http01:
        ingress:
          class: nginx
kubectl apply -f cluster-issuer-staging.yaml
kubectl get clusterissuers.cert-manager.io | grep True
Tài liệu về các dịch vụ trong hệ sinh thái của hệ thống gồm các dịch vụ của nhóm phát triển và các dịch vụ mã nguồn mở.
Dịch vụ lưu trữ mã hóa và quản lý định đanh người dùng
xem tại https://gitlab.com/n13t/idm/-/blob/master/DEVELOPMENT.md
Mô tả cách thức mã hóa dữ liệu người dùng
Thực hiện ngược lại các bước trên để giải mã dữ liệu
Collector Service - Dịch vụ thu thập dữ liệu
{ { < svg “content/docs/services/collector/img/overview.svg” > } } TODO: mo ta
Phương pháp này hỗ trợ người dùng nhập dữ liệu từ tin nhắn SMS
Yêu cầu
Cơ chế hoạt động
{{ < svg “content/docs/services/collector/img/sms_parser.svg” > }}
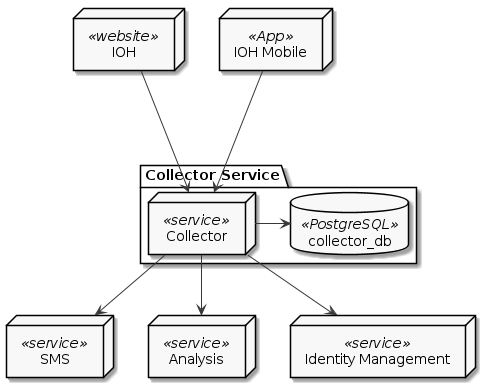
Collector Service cần có các thành phần sau khi triển để hoạt động đầy đủ chức năng:
Application Deployment Model: Stateless
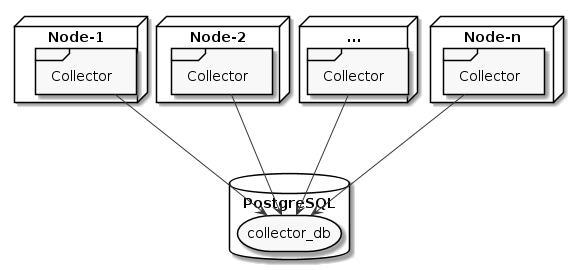
Tăng số lượng node để tăng khả năng chịu tài và độ ổn định của dịch vụ
A rule of thumb is to prefix resource names with a domain that represents the organization creating the software.
<some-id><organizaion-id>:<some-id>It is wise to scope actions, resources, and subjects in order to prevent name collisions:
myorg.com:<subject-id>, myorg.com:<resource-id>, myorg.com:<action-id>myorg.com:subjects:<subject-id>, myorg.com:resources:<resource-id>, myorg.com:actions:<action-id>subjects:myorg.com:<subject-id>, resources:myorg.com:<resource-id>, actions:myorg.com:<action-id>Multi-tenant systems typically have resources which should not be access by other tenants in the system. This can be achieved by adding the tenant id to the URN:
Do: resources:myorg.com:tenants:<tenant-id>:<resource-id>
In some environments, it is common to have organizations and projects belonging to those organizations. Here, the following URN semantics can be used:
Do: resources:myorg.com:organizations:<organization-id>:projects:<project-id>:<resource-id>
Các thuộc tính dùng để phân quyền của Users
{
    id: string
    role: string // role của service là admin hoặc user
}
Dịch vụ Collector gồm có các loại resource sau:
{
    id: string
}
{
    id: string
    ProjectId: string
}
{
    id: string
}
{
    id: string
}
{
    id: string
    FormId: string
}
Gồm có 3 loại chính sách:
Là các chính sách áp dụng trong Collector Service:
[request_definition]
r = sub, obj, act

[policy_definition]
p = sub, obj, act

[policy_effect]
e = some(where (p.eft == allow))

[matchers]
m = r.sub == r.obj.Owner
[request_definition]
r = sub, obj, act

[policy_definition]
p = sub, obj, act

[policy_effect]
e = some(where (p.eft == allow))

[matchers]
m = r.sub.role == reseacher
[request_definition]
r = sub, obj, act

[policy_definition]
p = sub, obj, act

[policy_effect]
e = some(where (p.eft == allow))

[matchers]
m = r.sub.role == reseacher
SMS Service có chức năng quản lý GSM Modem và cung cấp API hỗ trợ các hệ thống khác trong hệ thống thực hiện các chức năng như gửi, nhận tin nhắn SMS một cách thuận tiện nhất.
{{ < svg “content/docs/services/sms/img/component.svg” > }}
Để gửi tin nhắn các clients (là một server hay service khác, hoặc ứng dụng bất kỳ có kết nối đến SMS Service) gọi phương thức SendSms() đến SMS Service. Phần còn lại SMSS sẽ tự động thực hiện gọi SMS Gateway thông qua HTTP request để yêu cầu GSM Modem thực hiện lệnh AT gửi tin nhắn. SMS Service sẽ trả kết quả cho client khi hoàn thành việc gửi tin nhắn. Kết thúc gửi tin nhắn.
Đây là phiên bản đầu tiên của SMS Service nhằm hỗ trợ chức năng gửi và nhận tin nhắn. Phiên bản viết hoàn toàn bằng Node.js và dùng thư viện node-serialport để giao tiếp với GSM modem. Các luồng quản lý logic và sử lý hàng đợi tin nhắn được hiện thực dựa trên ý tưởng từ thư viện modem
{{ < svg “content/docs/services/sms/img/legacy.svg” > }}
urn :[oave]:[Tên theo quy định của VDAT]|Các tùy chỉnh cấu hình ứng với tổ chức
| Tên đầy đủ | Tên theo quy ước | Tập giá trị | Mô tả |
|---|---|---|---|
| Operating Agency based on VDAT Ecosystem | oave | Danh mục tổ chức | Các cơ quan có sử dụng hệ thống VDAT. Các Module ẩn thông tin này đi |
| Project | project | Số nguyên | Mã số dự án trong hệ thống (Collector tự sinh) |
| Feature | feature | Danh mục tính năng | Tính năng hỗ trợ |
| User group | group | Số nguyên | Nhóm thành viên liên kết |
| User | user | Số nguyên | Mã số người dùng |
| Form | form | Số nguyên | Mã số biểu mẫu trong hệ thống IOH |
| Section | section | Số nguyên | Mã số section trong hệ thống IOH |
| Tên tổ chức | Địa chỉ | Tên viết tắt |
|---|---|---|
| Bệnh viện Hùng Vương (Khoa sản bệnh) | 128 Hồng Bàng, Phường 12, Quận 5, Hồ Chí Minh | bvhv-ksb |
| Bệnh viện Hùng Vương (Dự án kiểm soát thiết bị phẫu thuật) | 128 Hồng Bàng, Phường 12, Quận 5, Hồ Chí Minh | bvhv-kstbpt |
| VDAT | H2.2 Đại học công nghiệp Tp Hồ Chí Minh | vdat-standard |
| VVHA | 6A Ngô Thời Nghiệm, P7, Quận 3 | vvha |
| Tên tính năng | Tên viết tắt | Mô tả | Value |
|---|---|---|---|
| Dành cho hệ thống Bệnh viện Hùng Vương – Khoa sản bệnh | |||
| PI Attribute | pi-attribute | Trạng thái của nhóm PI | -1 (Chưa xác định) |
| Researcher Attribute | researcher-attribute | Trạng thái của nhóm Người nghiên cứu | -1 (Chưa xác định) |
| Participant Attribute | participant-attribute | Trạng thái của nhóm bệnh nhân | Nội trú hoăc ngoại trú.Nội trú = 1Ngoại trú = 2 |
| Dành cho import từ File và định danh | |||
| Import | import | Tính năng import | Không xác định (Được nhập từ file) |
| Import with Identity | import-identity | Tính năng định danh người dùng qua một mã định danh | Không xác định (Được nhập từ file) |
| Dành cho hệ thống VVHA | |||
| Invation | invation | Mã thư mời | Không xác định |
| Examination | examination | Mã xét nghiệm | Không xác định |
| Archives | archives | Mã lưu trữ | Không xác định |
| Transfer | transfer | Mã giao mẫu | Không xác định |
urn : oave :bvhv-ksb: project :[projectId]: group :[groupId]: feature : pi-attribute
hoặc
urn : oave :bvhv-ksb: project :[projectId]: group :[groupId]: feature : researcher -attribute
hoặc
urn : oave :bvhv-ksb: project :[projectId]: group :[groupId]: feature : participant-attribute
urn : oave :vvha: project :[projectId]: group :[groupId]: feature :invation
hoặc
urn : oave :vvha: project :[projectId]: group :[groupId]: feature :examination
hoặc
urn : oave :vvha: project :[projectId]: group :[groupId]: feature :archives
hoặc
urn : oave :vvha: project :[projectId]: group :[groupId]: feature :transfer