Basic Security Concepts: Authentication
Fundamental security concepts and authentication methods
Overview
This document covers the basic security concepts and authentication methods used in web applications.
Authentication Methods
| Method | Description | Use Cases |
|---|
| Basic Auth | Simple username/password authentication sent in HTTP headers | Development environments, simple APIs |
| JWT Token | JSON Web Tokens for stateless authentication | Modern web applications, microservices |
| OAuth2 | Authorization framework that enables third-party applications to obtain limited access | Social logins, API authorization |
Basic Authentication
Basic Authentication is a simple authentication scheme built into the HTTP protocol. The client sends HTTP requests with the Authorization header that contains the word Basic followed by a space and a base64-encoded string username:password.
1 - JSON Web Token (JWT)
Understanding JSON Web Tokens (JWT) for secure authentication and information exchange.
JSON Web Tokens (JWT) provide a compact, URL-safe means of representing claims securely between two parties. They are commonly used for authentication and authorization in web applications.
What is JWT?
JSON Web Token (JWT) is an open standard (RFC 7519) that defines a compact and self-contained way for securely transmitting information between parties as a JSON object. This information can be verified and trusted because it is digitally signed.
JWTs can be:
- Signed using a secret (with the HMAC algorithm) or a public/private key pair (RSA or ECDSA)
- Encrypted to also provide secrecy between parties
JWT Structure
A JWT consists of three parts separated by dots (.):
xxxxx.yyyyy.zzzzz
- Header (xxxxx): Contains token type and signing algorithm
- Payload (yyyyy): Contains claims (user data and metadata)
- Signature (zzzzz): Ensures the token hasn’t been altered
JWT Token Structure Visualization
graph LR
    A[JWT Token] --> B[Header]
    A --> C[Payload]
    A --> D[Signature]

    B --> B1[Base64Url Encoded]
    C --> C1[Base64Url Encoded]

    B1 --> E["{
        alg: 'HS256',
        typ: 'JWT'
    }"]

    C1 --> F["{
        sub: '1234567890',
        name: 'John Doe',
        iat: 1516239022,
        exp: 1516242622
    }"]

    D --> G["HMACSHA256(
        base64UrlEncode(header) + '.' +
        base64UrlEncode(payload),
        secret)"]
How JWT Works
JWT authentication follows a simple flow:
- User logs in with credentials
- Server validates credentials and generates a JWT
- JWT is returned to the client
- Client stores the JWT (typically in local storage or a cookie)
- Client sends the JWT with subsequent requests
- Server validates the JWT signature and processes the request
JWT Authentication Flow
sequenceDiagram
    participant User
    participant Client
    participant Server

    User->>Client: Enter credentials
    Client->>Server: Authentication request
    Note right of Server: Validate credentials
    Server->>Server: Generate JWT with payload and signature
    Server->>Client: Return JWT
    Note left of Client: Store JWT

    loop For each protected request
        Client->>Server: Request with JWT in Authorization header
        Note right of Server: Validate JWT signature
        Note right of Server: Check expiration
        Server->>Client: Protected resource/response
    end
JWT Claims
Claims are statements about an entity (typically the user) and additional metadata. There are three types of claims:
Registered Claims: Predefined claims providing a set of useful, interoperable claims
iss (issuer)sub (subject)aud (audience)exp (expiration time)nbf (not before)iat (issued at)jti (JWT ID)
Public Claims: Custom claims defined by those using JWTs
Private Claims: Custom claims created to share information between parties
JWT Implementation Example
Here’s a simplified example of generating and validating a JWT:
Server-side: Generating a JWT (Node.js)
const jwt = require('jsonwebtoken');

// User authentication function
function authenticate(username, password) {
  // Validate user credentials (simplified)
  if (isValidUser(username, password)) {
    // Create token payload
    const payload = {
      sub: getUserId(username),
      name: username,
      role: getUserRole(username),
      iat: Math.floor(Date.now() / 1000),
      exp: Math.floor(Date.now() / 1000) + (60 * 60) // 1 hour expiration
    };

    // Generate and sign token
    const token = jwt.sign(payload, process.env.JWT_SECRET);
    return token;
  }
  throw new Error('Authentication failed');
}
Server-side: Validating a JWT (Node.js)
const jwt = require('jsonwebtoken');

// Middleware to validate JWT
function verifyToken(req, res, next) {
  // Get auth header value
  const bearerHeader = req.headers['authorization'];

  if (bearerHeader) {
    // Extract token from "Bearer <token>"
    const token = bearerHeader.split(' ')[1];

    jwt.verify(token, process.env.JWT_SECRET, (err, decoded) => {
      if (err) {
        return res.status(403).json({ message: 'Invalid or expired token' });
      }

      // Add decoded user info to request object
      req.user = decoded;
      next();
    });
  } else {
    res.status(401).json({ message: 'Access denied. No token provided.' });
  }
}
JWT Storage Security Diagram
graph TD
    A[JWT Storage Options] --> B[Browser Storage]
    A --> C[HTTP Only Cookie]

    B --> D[localStorage]
    B --> E[sessionStorage]
    B --> F[Memory Variable]

    D --> G[Pros: Simple, Persists]
    D --> H[Cons: XSS Vulnerable]

    E --> I[Pros: Session-bound]
    E --> J[Cons: XSS Vulnerable]

    F --> K[Pros: Not accessible via XSS]
    F --> L[Cons: Lost on refresh]

    C --> M[Pros: XSS Protected, CSRF can be mitigated]
    C --> N[Cons: Server config required]

    style C fill:#c9e7f9
    style M fill:#c9f9d9
Best Practices for JWT
Use HTTPS: Always transmit JWTs over HTTPS to prevent token theft through network eavesdropping
Set Proper Expiration: Use short expiration times and implement token refresh
graph LR
    A[Token Types] --> B[Access Token]
    A --> C[Refresh Token]
    B --> D[Short lived: 15min - 1hr]
    C --> E[Longer lived: days/weeks]
    B --> F[Frequent validation]
    C --> G[Stored securely server-side]
Validate All Claims: Check issuer, audience, expiration, and all other relevant claims
Keep Tokens Small: Include only necessary data in the payload to maintain performance
Secure Storage: Store tokens securely, preferably in HttpOnly cookies for web applications
Implement Token Revocation: Have a strategy for invalidating tokens when needed (logout, password change)
Use Strong Keys: Use strong, randomly generated secrets for signing tokens
JWT vs Session Authentication
graph TB
    subgraph "JWT Authentication"
        A1[Client] -->|1. Login| B1[Server]
        B1 -->|2. JWT Token| A1
        A1 -->|3. Request with JWT| B1
        B1 -->|4. Validate JWT & Respond| A1
    end

    subgraph "Session Authentication"
        A2[Client] -->|1. Login| B2[Server]
        B2 -->|2. Session ID Cookie| A2
        A2 -->|3. Request with Cookie| B2
        B2 -->|4. Lookup Session & Respond| B2
    end

    C[Comparison]
    C --> D[JWT: Stateless, no session storage]
    C --> E[Session: Stateful, session storage required]
    C --> F[JWT: Larger request size]
    C --> G[Session: Smaller request size]
    C --> H[JWT: Decentralized validation possible]
    C --> I[Session: Centralized validation required]
Common JWT Security Vulnerabilities
None Algorithm Attack: Ensure your JWT library rejects tokens with the “none” algorithm
Algorithm Confusion: Ensure proper algorithm verification is implemented
Missing Signature Validation: Always validate signatures, never trust just the presence of a token
Weak Secrets: Use strong, random secrets or keys for token signing
Token Sidejacking: Implement additional security measures to prevent token theft
Further Reading
2 - OAuth2
Tài liệu về OAuth2 và cách sử dụng trong hệ thống
OAuth2 và OpenID Connect
OAuth2 là một giao thức ủy quyền cho phép các ứng dụng bên thứ ba có thể truy cập tài nguyên của người dùng mà không cần biết thông tin đăng nhập của họ. OpenID Connect là một lớp xác thực được xây dựng trên OAuth2, cung cấp thêm thông tin về người dùng.
Luồng xác thực OAuth2

Hệ thống sử dụng OAuth2 và OpenID Connect để xác thực và phân quyền giữa các dịch vụ. Mỗi dịch vụ tự quản lý phân quyền và sử dụng IAM (Identity Access Management) để hỗ trợ xác thực người dùng.
Chọn luồng xác thực OAuth2
xem phần đề để chọn luồng xác thực phù hợp với ứng dụng hoặc dịch vụ của mình.
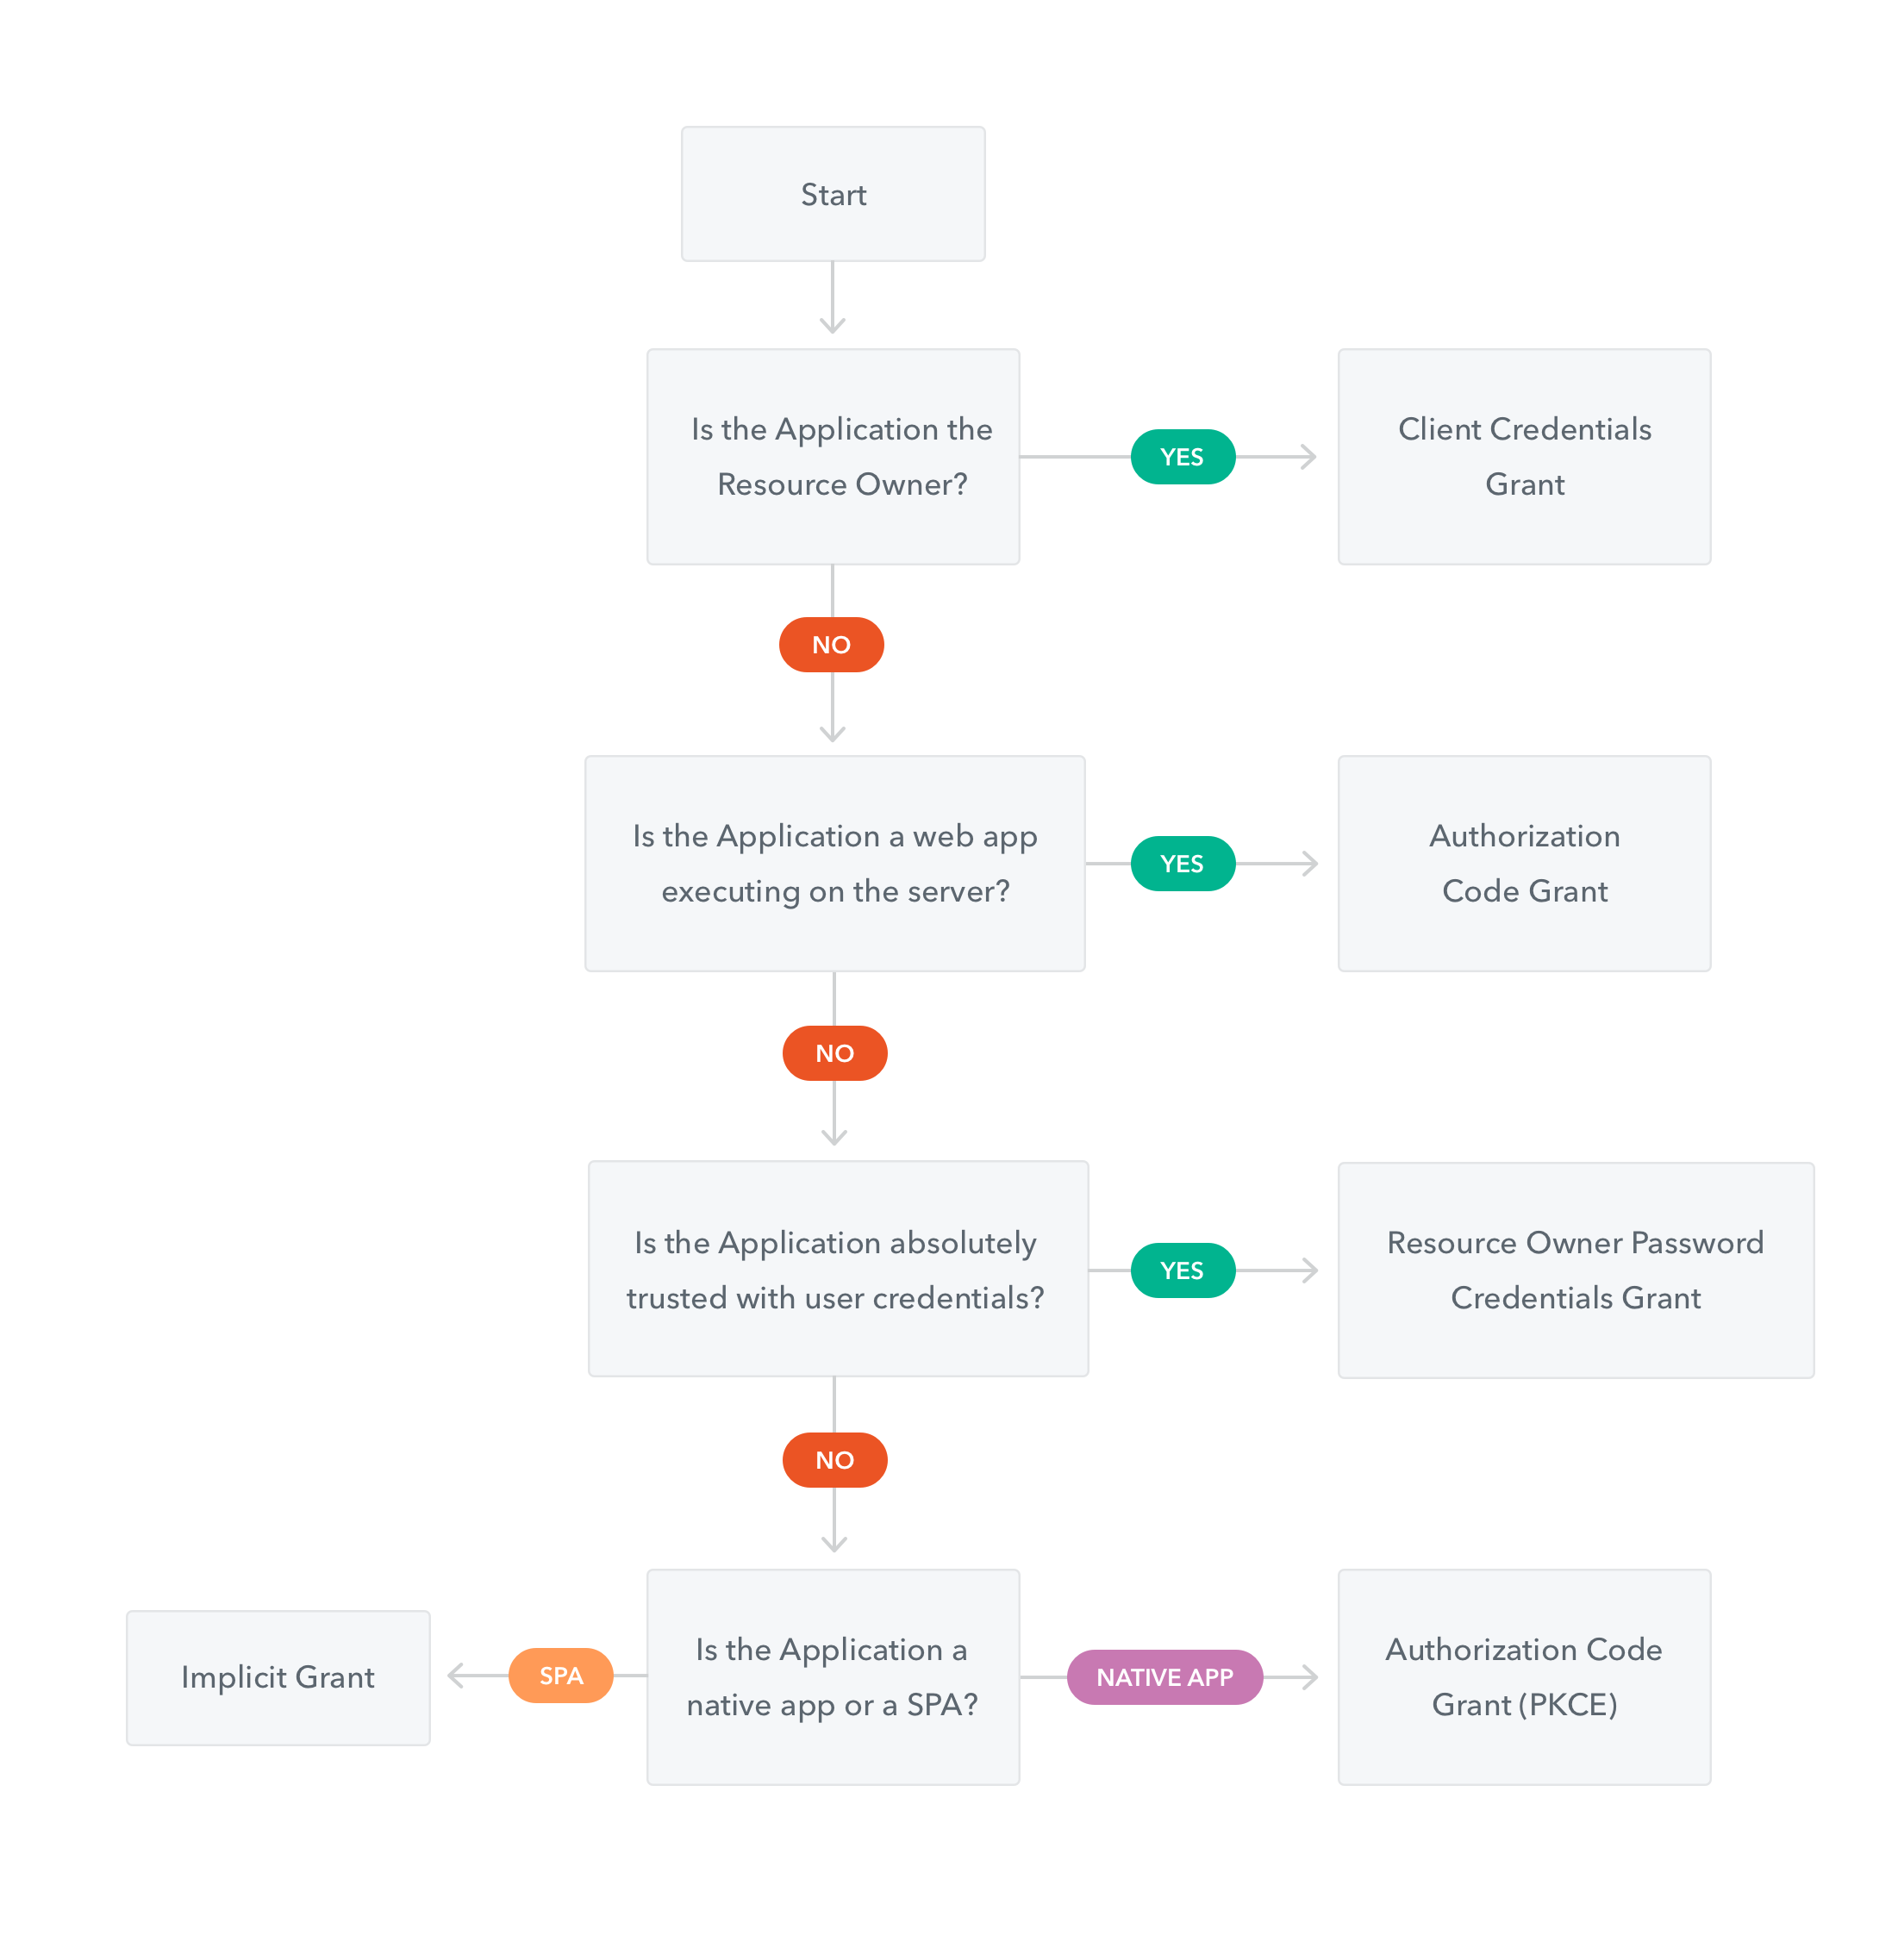
tham khảo: https://auth0.com/docs/api-auth/which-oauth-flow-to-use
OpenID Configuration
Xem phần này để biết cấu hình kết nối với Identity Provider để thực hiện xác thực v.v.
{
    issuer: "https://accounts.vdatlab.com/auth/realms/vdatlab.com",
    authorization_endpoint: "https://accounts.vdatlab.com/auth/realms/vdatlab.com/protocol/openid-connect/auth",
    token_endpoint: "https://accounts.vdatlab.com/auth/realms/vdatlab.com/protocol/openid-connect/token",
    token_introspection_endpoint: "https://accounts.vdatlab.com/auth/realms/vdatlab.com/protocol/openid-connect/token/introspect",
    userinfo_endpoint: "https://accounts.vdatlab.com/auth/realms/vdatlab.com/protocol/openid-connect/userinfo",
    end_session_endpoint: "https://accounts.vdatlab.com/auth/realms/vdatlab.com/protocol/openid-connect/logout",
    jwks_uri: "https://accounts.vdatlab.com/auth/realms/vdatlab.com/protocol/openid-connect/certs",
    check_session_iframe: "https://accounts.vdatlab.com/auth/realms/vdatlab.com/protocol/openid-connect/login-status-iframe.html",
    grant_types_supported: [
        "authorization_code",
        "implicit",
        "refresh_token",
        "password",
        "client_credentials"
    ],
    response_types_supported: [
        "code",
        "none",
        "id_token",
        "token",
        "id_token token",
        "code id_token",
        "code token",
        "code id_token token"
    ],
    ...
}
cấu hình đầy đủ: https://accounts.vdatlab.com/auth/realms/vdatlab.com/.well-known/openid-configuration
Hướng dẫn cấu hình 1 số biến cho các flow cơ bản
Flow xử dụng (ví dụ trong Postman):
- đối với Web app =>
Implicit - đố i với service =>
Client Credentials
trong đó:
- đối với luồng Implicit: lấy thông tin
authorization_endpoint từ config và clientId, callback_url, scopes/defaultClientScopes từ thông tin client - đối với luồng Client Credentials: thông tin
token_endpoint từ config và clientId, scopes/defaultClientScopes từ thông tin client; client_secret được cấp bởi admin