This is the multi-page printable view of this section. Click here to print.
Documentation
- 1: Angular Documentation
- 1.1: Getting Started
- 1.2: Components
- 1.3: Data Binding
- 1.4: Modules
- 1.5: Dependency Injection
- 1.6: Forms
- 1.7: Routing
- 1.8:
- 2: Node.js Documentation
- 2.1: NestJS
- 3: Git & Common Git Providers
- 3.1: GitLab
- 4: Docker Cheat Sheet
- 4.1: Docker Cheat Sheet
- 4.2: Docker Architecture
- 5: PostgreSQL
- 6: Development
- 7: Go Programming
- 8: Data Platform
- 8.1: Data Collection & Integration
- 8.2: Data Integration
- 8.3: Data Visualization & Analytics
- 8.4: Data Governance & Compliance
- 8.5: Statistical Learning Models
- 8.6: Medical Imaging
- 9: Security & Compliance
- 9.1: Basic Security Concepts: Authentication
- 9.1.1: JSON Web Token (JWT)
- 9.1.2: OAuth2
- 9.2: Secret Management
- 9.2.1: SOPS: Secrets OPerationS
- 9.3: VPN
- 9.3.1: Tailscale
- 9.4: Zero Trust Network Architecture (ZTNA)
- 10: Operations
- 10.1: Ansible
- 10.2: Kubernetes
- 10.2.1: Port Forward Kubernetes
- 10.3: OpenTelemetry
- 10.4: GitOps
1 - Angular Documentation
Angular Documentation
Welcome to the Angular documentation. This guide will help you understand and work with Angular framework.
Table of Contents
Overview
Angular is a platform and framework for building single-page client applications using HTML and TypeScript. Angular is written in TypeScript. It implements core and optional functionality as a set of TypeScript libraries that you import into your applications.
Overview (5 minutes)
What is Angular?
A front-end framework developed by Google for building dynamic web applications (SPA - Single Page Application).
Key Difference
Angular (2+) is a complete rewrite and fundamentally different from AngularJS (1.x). It’s built with TypeScript and offers improved performance, better dependency injection, and more intuitive component architecture.
Basic Setup
- Node.js installation required
- npm (Node Package Manager)
- Angular CLI installation:
npm install -g @angular/cli - Create new project:
ng new
Evaluation Question
“What’s an SPA? Can anyone explain?”
Architecture
Key Features
- Component-Based Architecture: Build encapsulated components that manage their own templates and logic
- Modern Tools: Use modern tools for development, testing, and deployment
- Performance: Fast rendering and deep optimization capabilities
- Full Development Story: Everything you need to build complex applications
Prerequisites
- Node.js (version 16.x or higher)
- npm (Node Package Manager)
- Basic knowledge of HTML, CSS, and JavaScript/TypeScript
Getting Help
- Check the official Angular documentation
- Official Angular Playground
- Report issues on GitHub
For detailed information about each topic, please follow the links in the Table of Contents.
1.1 - Getting Started
Getting Started with Angular
Overview (5 minutes)
What is Angular?
Angular is a powerful front-end framework developed by Google for building dynamic web applications, specifically Single Page Applications (SPAs). It provides a comprehensive solution for:
- Building scalable web applications
- Creating reusable UI components
- Managing application state
- Handling routing and navigation
- Form handling and validation
Key Differences: Angular vs AngularJS
Angular (2+) represents a complete reimagining of the original AngularJS framework:
| Feature | Angular (2+) | AngularJS (1.x) |
|---|---|---|
| Language | TypeScript | JavaScript |
| Architecture | Component-based | MVC |
| Mobile Support | Yes | Limited |
| Performance | Improved | Basic |
| Learning Curve | Moderate | Steep |
Basic Setup Requirements
Node.js
- Download from nodejs.org
- Recommended version: 16.x or higher
- Includes npm (Node Package Manager)
Angular CLI
npm install -g @angular/cliCreate New Project
ng new my-app
cd my-app
ng serve
Playground
Understanding SPAs
A Single Page Application (SPA) is a web application that:
- Loads a single HTML page
- Dynamically updates content without full page reloads
- Provides a more fluid user experience
- Reduces server load by only requesting data, not entire pages
Benefits of SPAs:
- Faster user experience after initial load
- Reduced server load
- Better caching capabilities
- More app-like feel
Common Questions
Q: “What’s an SPA? Can anyone explain?” A: An SPA is a web application that operates within a single page, dynamically rewriting the current page rather than loading entire new pages from the server.
Next Steps
- Learn about Components
- Understand Angular Modules
- Explore Data Binding
1.2 - Components
Components (10 minutes)
Components: The Building Blocks
Components are the fundamental building blocks of Angular applications. Each component consists of:
- A TypeScript class with the
@Componentdecorator - An HTML template defining the UI
- CSS styles specific to the component
Creating a Component
Checking on Playround: ng-002 | Basic Component
Using Angular CLI:
ng generate component hello-world
# or shorter version
ng g c hello-world
This creates:
hello-world/
├── hello-world.component.ts
├── hello-world.component.html
├── hello-world.component.css
└── hello-world.component.spec.ts
Basic Component Example
// hello-world.component.ts
import { Component } from '@angular/core';

@Component({
  selector: 'app-hello-world',
  template: `
    <h1>{{ greeting }}</h1>
    <button (click)="changeGreeting()">Change Greeting</button>
  `,
  styles: [`
    h1 { color: blue; }
  `]
})
export class HelloWorldComponent {
  greeting = 'Hello, World!';

  changeGreeting() {
    this.greeting = 'Hello, Angular!';
  }
}
Component Interaction
Checking on Playround: ng-002 | Parent Component
Parent to Child (@Input)
Use @Input decorator to pass data from parent to child components:
// child.component.ts
import { Component, Input } from '@angular/core';

@Component({
  selector: 'app-child',
  template: `
    <h2>Hello, {{name}}!</h2>
    <button (click)="onClick()">Click me</button>
  `
})
export class ChildComponent {
  @Input() name: string = '';  // Receive name from parent

  onClick() {
    this.buttonClicked.emit(`Button clicked by ${this.name}`);
  }
}

// parent.component.ts
@Component({
  selector: 'app-parent',
  template: `
    <h1>Parent Component</h1>
    <app-child
      [name]="parentName"
      (buttonClicked)="handleClick($event)">
    </app-child>
  `
})
export class ParentComponent {
  parentName = 'John';  // Data to send to child

  handleClick(message: string) {
    console.log(message);  // Logs: "Button clicked by John"
  }
}
Child to Parent (@Output)
Use @Output decorator with EventEmitter to send data from child to parent:
// child.component.ts
import { Component, Input, Output, EventEmitter } from '@angular/core';

@Component({
  selector: 'app-child',
  template: `
    <h2>Hello, {{name}}!</h2>
    <button (click)="onClick()">Click me</button>
  `
})
export class ChildComponent {
  @Input() name: string = '';
  @Output() buttonClicked = new EventEmitter<string>();

  onClick() {
    this.buttonClicked.emit(`Button clicked by ${this.name}`);
  }
}
Complete Example
Here’s a practical example combining both @Input and @Output:
// message.interface.ts
interface Message {
  text: string;
  sender: string;
  timestamp: Date;
}

// message.component.ts
@Component({
  selector: 'app-message',
  template: `
    <div class="message">
      <h3>From: {{name}}</h3>
      <input [(ngModel)]="messageText">
      <button (click)="sendMessage()">Send</button>
    </div>
  `
})
export class MessageComponent {
  @Input() name: string = '';
  @Output() messageSent = new EventEmitter<Message>();

  messageText = '';

  sendMessage() {
    this.messageSent.emit({
      text: this.messageText,
      sender: this.name,
      timestamp: new Date()
    });
    this.messageText = '';
  }
}

// chat.component.ts
@Component({
  selector: 'app-chat',
  template: `
    <app-message
      [name]="userName"
      (messageSent)="handleMessage($event)">
    </app-message>
    <div class="message-list">
      <div *ngFor="let msg of messages">
        {{msg.sender}}: {{msg.text}}
        <small>{{msg.timestamp | date:'short'}}</small>
      </div>
    </div>
  `
})
export class ChatComponent {
  userName = 'John';
  messages: Message[] = [];

  handleMessage(message: Message) {
    this.messages.push(message);
  }
}
Best Practices
- Use meaningful names for @Input and @Output properties
- Keep component communication simple and predictable
- Document complex interactions
- Use TypeScript interfaces for complex data structures
- Handle edge cases and errors in component communication
- Consider using services for complex state management between components
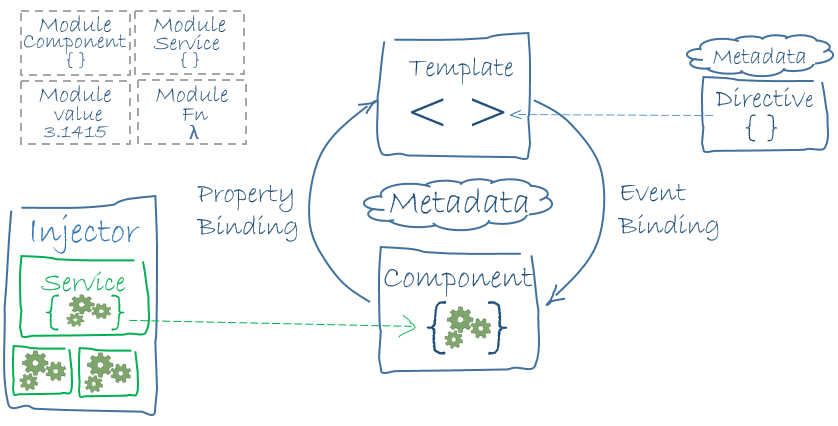
1.3 - Data Binding
Data Binding in Angular
Types of Data Binding
Angular provides several ways to bind data between your component’s TypeScript code and the HTML template.
1. One-way Binding
Data flows in one direction: from the component to the view (HTML).
Interpolation {{ }}
Displays component data in the view:
// component.ts
export class GreetingComponent {
  name = 'John';
}
<!-- template.html -->
<h1>Hello, {{name}}!</h1>
Property Binding [ ]
Binds a component property to an element property:
// component.ts
export class ButtonComponent {
  isDisabled = true;
  imageUrl = 'path/to/image.jpg';
}
<!-- template.html -->
<button [disabled]="isDisabled">Click me</button>
<img [src]="imageUrl" [alt]="'Profile image'">
2. Two-way Binding [( )]
Synchronizes data in both directions between the component and view.
Using ngModel
First, import FormsModule in your module:
// app.module.ts
import { FormsModule } from '@angular/forms';

@NgModule({
  imports: [
    BrowserModule,
    FormsModule  // Add this
  ],
  // ...
})
export class AppModule { }
Then use [(ngModel)] in your component:
// component.ts
export class NameComponent {
  name = '';
}
<!-- template.html -->
<input [(ngModel)]="name">
<p>Hello, {{name}}!</p>
Complete Example
Here’s a working example combining different types of binding:
// name-editor.component.ts
import { Component } from '@angular/core';

@Component({
  selector: 'app-name-editor',
  template: `
    <div>
      <label>Name: </label>
      <!-- Two-way binding -->
      <input [(ngModel)]="name">

      <!-- One-way binding with interpolation -->
      <p>Hello, {{name}}!</p>

      <!-- Property binding -->
      <button [disabled]="!name">Clear</button>

      <!-- Event binding -->
      <button (click)="resetName()">Reset</button>
    </div>
  `
})
export class NameEditorComponent {
  name = '';

  resetName() {
    this.name = '';
  }
}
Evaluation Question
Q: “How do you change an input value without ngModel?”
A: You can use a combination of property binding and event binding (also known as “banana in a box” syntax):
// component.ts
export class ManualBindingComponent {
  name = '';

  onNameChange(event: any) {
    this.name = event.target.value;
  }
}
<!-- template.html -->
<input [value]="name" (input)="onNameChange($event)">
<p>Hello, {{name}}!</p>
This approach:
- Uses [value] to bind the component property to the input
- Uses (input) event to update the component property when the user types
- Gives you more control over the input handling
- Doesn’t require FormsModule
Best Practices
- Use interpolation {{ }} for text content
- Use property binding [ ] for element properties
- Use [(ngModel)] for form inputs when two-way binding is needed
- Consider manual binding for more control or when FormsModule isn’t available
- Always validate and sanitize user input when using two-way binding
1.4 - Modules
Components (10 minutes)
Modules: Code Organization
Modules in Angular help organize related code into cohesive blocks of functionality. They are decorated with @NgModule.
Module Structure
// app.module.ts
import { NgModule } from '@angular/core';
import { BrowserModule } from '@angular/platform-browser';
import { AppComponent } from './app.component';
import { HelloWorldComponent } from './hello-world/hello-world.component';

@NgModule({
  declarations: [
    AppComponent,
    HelloWorldComponent    // Components must be declared in a module
  ],
  imports: [
    BrowserModule         // Other modules we want to use
  ],
  providers: [],          // Services for dependency injection
  bootstrap: [AppComponent] // Root component to start with
})
export class AppModule { }
Key Module Concepts
- Declarations: List of components, directives, and pipes that belong to this module
- Imports: Other modules that this module needs
- Providers: Services that will be available to the entire application
- Bootstrap: The main application view (root component)
Feature Modules
For better organization, you can create feature modules:
ng generate module feature-name
Example structure:
@NgModule({
  declarations: [FeatureComponent],
  imports: [
    CommonModule,
    FeatureRoutingModule
  ],
  exports: [FeatureComponent]  // Make components available to other modules
})
export class FeatureModule { }
Evaluation Question
Q: “To add a new page, do you create a component or a module? Why?”
A: The answer depends on your needs:
- Create a Component if you’re adding a single new page/view
- Create a Module if you’re adding a feature with multiple related components, services, and routes
Best practices:
- Components for individual pages/features
- Modules for grouping related functionality
- Feature modules for lazy loading and better organization
Common Patterns
- Shared Module: For commonly used components, directives, and pipes
- Core Module: For singleton services and single-load components
- Feature Modules: For distinct features of your application
- Routing Modules: For managing navigation between pages
1.5 - Dependency Injection
Dependency Injection (DI) in Angular
What is Dependency Injection?
Dependency Injection (DI) is a design pattern where classes receive their dependencies from an external source rather than creating them internally. In Angular, the DI system provides and manages dependencies across your application.
Basic Service Example
Here’s a simple service that manages a list of Fresher names:
// fresher.service.ts
import { Injectable } from '@angular/core';

@Injectable({
  providedIn: 'root'  // Makes this a singleton service
})
export class FresherService {
  private freshers: string[] = [
    'John Doe',
    'Jane Smith',
    'Mike Johnson'
  ];

  getFreshers(): string[] {
    return this.freshers;
  }

  addFresher(name: string) {
    this.freshers.push(name);
  }
}
Using the Service in Components
// fresher-list.component.ts
import { Component, OnInit } from '@angular/core';
import { FresherService } from './fresher.service';

@Component({
  selector: 'app-fresher-list',
  template: `
    <h2>Fresher List</h2>
    <ul>
      <li *ngFor="let fresher of freshers">
        {{ fresher }}
      </li>
    </ul>
    <button (click)="addNewFresher()">Add Fresher</button>
  `
})
export class FresherListComponent implements OnInit {
  freshers: string[] = [];

  constructor(private fresherService: FresherService) {}

  ngOnInit() {
    this.freshers = this.fresherService.getFreshers();
  }

  addNewFresher() {
    this.fresherService.addFresher('New Fresher');
    this.freshers = this.fresherService.getFreshers();
  }
}
Service with HTTP Example
Here’s a more realistic example using HttpClient:
// fresher.interface.ts
interface Fresher {
  id: number;
  name: string;
  email: string;
}

// fresher.service.ts
import { Injectable } from '@angular/core';
import { HttpClient } from '@angular/common/http';
import { Observable } from 'rxjs';

@Injectable({
  providedIn: 'root'
})
export class FresherService {
  private apiUrl = 'api/freshers';

  constructor(private http: HttpClient) {}

  getFreshers(): Observable<Fresher[]> {
    return this.http.get<Fresher[]>(this.apiUrl);
  }

  addFresher(fresher: Fresher): Observable<Fresher> {
    return this.http.post<Fresher>(this.apiUrl, fresher);
  }
}
DI Providers
There are different ways to provide services in Angular:
- Root-level Provider (Singleton):
@Injectable({
  providedIn: 'root'
})
- Module-level Provider:
@NgModule({
  providers: [FresherService]
})
- Component-level Provider:
@Component({
  providers: [FresherService]  // New instance for this component
})
Best Practices
- Use providedIn: ‘root’ for singleton services
@Injectable({
  providedIn: 'root'
})
- Implement OnDestroy for cleanup:
export class MyService implements OnDestroy {
  ngOnDestroy() {
    // Cleanup code
  }
}
- Use Interfaces for better type safety:
interface ServiceConfig {
  apiUrl: string;
  timeout: number;
}

@Injectable({providedIn: 'root'})
class MyService {
  constructor(@Inject('CONFIG') private config: ServiceConfig) {}
}
- Lazy Loading with feature modules:
@Injectable({
  providedIn: 'any'  // New instance per lazy-loaded module
})
Common Use Cases
- Data Services: Managing application data
@Injectable({providedIn: 'root'})
export class DataService {
  private data: any[] = [];

  getData() { return this.data; }
  addData(item: any) { this.data.push(item); }
}
- State Management: Managing application state
@Injectable({providedIn: 'root'})
export class StateService {
  private state = new BehaviorSubject<any>(initialState);
  state$ = this.state.asObservable();

  updateState(newState: any) {
    this.state.next(newState);
  }
}
- Utility Services: Shared functionality
@Injectable({providedIn: 'root'})
export class UtilityService {
  formatDate(date: Date): string {
    return date.toLocaleDateString();
  }

  generateId(): string {
    return Math.random().toString(36).substr(2, 9);
  }
}
Testing with DI
describe('FresherComponent', () => {
  let component: FresherComponent;
  let service: FresherService;

  beforeEach(() => {
    TestBed.configureTestingModule({
      declarations: [FresherComponent],
      providers: [FresherService]
    });

    component = TestBed.createComponent(FresherComponent).componentInstance;
    service = TestBed.inject(FresherService);
  });

  it('should load freshers', () => {
    const mockFreshers = ['John', 'Jane'];
    spyOn(service, 'getFreshers').and.returnValue(mockFreshers);

    component.ngOnInit();
    expect(component.freshers).toEqual(mockFreshers);
  });
});
1.6 - Forms
Forms in Angular (10 minutes)
Reactive Forms
Reactive Forms provide a model-driven approach to handling form inputs and validation. They are more robust, scalable, and testable than template-driven forms.
Setup
First, import ReactiveFormsModule in your module:
// app.module.ts
import { ReactiveFormsModule } from '@angular/forms';

@NgModule({
  imports: [
    BrowserModule,
    ReactiveFormsModule  // Add this
  ],
  // ...
})
export class AppModule { }
Basic Example
Here’s a simple form with a “Name” input that logs to console on submit:
// name-form.component.ts
import { Component } from '@angular/core';
import { FormGroup, FormControl } from '@angular/forms';

@Component({
  selector: 'app-name-form',
  template: `
    <form [formGroup]="form" (ngSubmit)="onSubmit()">
      <div>
        <label for="name">Name:</label>
        <input id="name" type="text" formControlName="name">
      </div>
      <button type="submit">Submit</button>
    </form>
  `
})
export class NameFormComponent {
  form = new FormGroup({
    name: new FormControl('')  // Initialize with empty string
  });

  onSubmit() {
    console.log(this.form.value);  // Logs: { name: 'whatever user typed' }
  }
}
Comparison with Template-driven Forms
Reactive Forms (FormGroup/FormControl)
- Model-driven approach
- More scalable for complex forms
- Better for form validation
- Easier to test
- Synchronous data flow
- Better type safety
Template-driven Forms (ngModel)
- Simpler for basic forms
- Similar to AngularJS
- Asynchronous data flow
- More magical (less explicit)
Adding Form Controls
To add more fields, simply add new FormControl instances to your FormGroup:
form = new FormGroup({
  name: new FormControl(''),
  email: new FormControl('')  // Adding email field
});
Corresponding template:
<form [formGroup]="form" (ngSubmit)="onSubmit()">
  <div>
    <label for="name">Name:</label>
    <input id="name" type="text" formControlName="name">
  </div>
  <div>
    <label for="email">Email:</label>
    <input id="email" type="email" formControlName="email">
  </div>
  <button type="submit">Submit</button>
</form>
Form Validation
You can add validators to your form controls:
import { Validators } from '@angular/forms';

form = new FormGroup({
  name: new FormControl('', Validators.required),
  email: new FormControl('', [
    Validators.required,
    Validators.email
  ])
});
Check validation status:
<div *ngIf="form.get('email')?.errors?.['required']">
  Email is required
</div>
<div *ngIf="form.get('email')?.errors?.['email']">
  Please enter a valid email
</div>
Evaluation Question
Q: “How do you add an ‘Email’ input to this form?”
A: To add an email input:
- Add the FormControl to your FormGroup:
form = new FormGroup({
  name: new FormControl(''),
  email: new FormControl('')  // Add this line
});
- Add the input to your template:
<div>
  <label for="email">Email:</label>
  <input id="email" type="email" formControlName="email">
</div>
- Optional: Add validation:
email: new FormControl('', [
  Validators.required,
  Validators.email
])
Best Practices
- Always use Reactive Forms for complex forms
- Group related fields using nested FormGroups
- Add proper validation with error messages
- Use typed forms (Angular 14+) for better type safety
- Handle form submission with proper error handling
- Use form builders for cleaner code:
constructor(private fb: FormBuilder) {
  this.form = this.fb.group({
    name: [''],
    email: ['']
  });
}
1.7 - Routing
Angular Routing
Basic Routing Concepts
Angular Router enables navigation between views without page reloads, creating a smoother user experience.
Setup
- Configure routes in a routing module:
// app-routing.module.ts
import { NgModule } from '@angular/core';
import { RouterModule, Routes } from '@angular/router';
import { HomeComponent } from './home/home.component';
import { FormPageComponent } from './form-page/form-page.component';

const routes: Routes = [
  { path: '', component: HomeComponent },
  { path: 'form', component: FormPageComponent },
  { path: '**', redirectTo: '' }  // Wildcard route for 404
];

@NgModule({
  imports: [RouterModule.forRoot(routes)],
  exports: [RouterModule]
})
export class AppRoutingModule { }
- Add router outlet to your main app component:
<!-- app.component.html -->
<nav>
  <a routerLink="/">Home</a>
  <a routerLink="/form">Form Page</a>
</nav>

<router-outlet></router-outlet>
Example: Home and Form Page Navigation
Components Setup
// home.component.ts
@Component({
  selector: 'app-home',
  template: '<h1>Welcome Home!</h1>'
})
export class HomeComponent { }

// form-page.component.ts
@Component({
  selector: 'app-form-page',
  template: '<h1>Form Page</h1>'
})
export class FormPageComponent { }
Navigation Methods
- Using RouterLink directive:
<a routerLink="/form">Go to Form</a>
- Programmatic navigation:
import { Router } from '@angular/router';

export class NavComponent {
  constructor(private router: Router) {}

  goToForm() {
    this.router.navigate(['/form']);
  }
}
Running Code on Route Changes
To execute code on every route change, use Router events:
// app.component.ts
import { Component } from '@angular/core';
import { Router, NavigationEnd } from '@angular/router';
import { filter } from 'rxjs/operators';

@Component({
  selector: 'app-root',
  template: '<router-outlet></router-outlet>'
})
export class AppComponent {
  constructor(private router: Router) {
    // Listen to route changes
    this.router.events.pipe(
      filter(event => event instanceof NavigationEnd)
    ).subscribe((event: NavigationEnd) => {
      console.log('Route changed to:', event.url);
      // Your code here
    });
  }
}
Using Route Guards
For more control over navigation:
// auth.guard.ts
import { Injectable } from '@angular/core';
import { CanActivate, Router } from '@angular/router';

@Injectable({
  providedIn: 'root'
})
export class AuthGuard implements CanActivate {
  constructor(private router: Router) {}

  canActivate(): boolean {
    // Your logic here
    return true;
  }
}
Apply guard to routes:
const routes: Routes = [
  {
    path: 'form',
    component: FormPageComponent,
    canActivate: [AuthGuard]
  }
];
Evaluation Question
Q: “How do you make a service run on every page change?”
A: There are several ways to run a service on page changes:
- Using Router Events in a Service:
@Injectable({
  providedIn: 'root'
})
export class RouteService {
  constructor(private router: Router) {
    this.router.events.pipe(
      filter(event => event instanceof NavigationEnd)
    ).subscribe(() => {
      this.onRouteChange();
    });
  }

  private onRouteChange() {
    // Your code here
    console.log('Route changed!');
  }
}
- Using Guards:
@Injectable({
  providedIn: 'root'
})
export class RouteGuard implements CanActivate {
  constructor(private myService: MyService) {}

  canActivate(): boolean {
    this.myService.doSomething();
    return true;
  }
}
Best Practices
- Always include a default route
- Handle 404 cases with a wildcard route
- Use route parameters for dynamic content
- Implement lazy loading for better performance
- Add route guards for protected routes
- Use route resolvers for data pre-fetching
- Consider using child routes for nested views
1.8 -
2 - Node.js Documentation
Node.js Documentation
Welcome to the Node.js documentation. This guide will help you understand and work with Node.js.
Table of Contents
- Basic Concepts
- Core Modules
- NPM Commands
- File System Operations
- HTTP Server
- Asynchronous Programming
- Error Handling
- Environment Variables
Basic Concepts
| Concept | Description |
|---|---|
| Node.js | JavaScript runtime built on Chrome’s V8 JavaScript engine |
| Event-driven | Uses non-blocking I/O model that makes it lightweight and efficient |
| NPM | Node Package Manager for installing and managing dependencies |
| package.json | Configuration file that contains metadata about the project |
| Modules | Reusable blocks of code that can be imported/exported |
Core Modules
| Module | Description |
|---|---|
fs | File system operations |
http | HTTP server and client functionality |
path | Utilities for working with file and directory paths |
os | Operating system-related utility methods |
events | For handling and emitting events |
util | Utility functions |
stream | For working with streaming data |
crypto | Cryptographic functionality |
NPM Commands
| Command | Description |
|---|---|
npm init | Initialize a new Node.js project |
npm install <package> | Install a package |
npm install -g <package> | Install a package globally |
npm install --save-dev <package> | Install as a development dependency |
npm uninstall <package> | Uninstall a package |
npm update | Update packages |
npm list | List installed packages |
npm run <script> | Run a script defined in package.json |
File System Operations
Package Manager
2.1 - NestJS
NestJS is a framework for building efficient, scalable Node.js server-side applications. It uses modern JavaScript, is built with TypeScript and combines elements of OOP (Object Oriented Programming), FP (Functional Programming), and FRP (Functional Reactive Programming).
3 - Git & Common Git Providers
Git Documentation
Welcome to the Git documentation. This guide will help you understand and work with Git version control system.
Table of Contents
Basic Commands
| Command | Description |
|---|---|
git init | Initialize a new Git repository |
git clone <url> | Clone a repository from remote source |
git add <file> | Add file(s) to staging area |
git add . | Add all modified files to staging area |
git commit -m "message" | Commit staged changes with a message |
git status | Show working tree status |
git log | Show commit history |
git diff | Show changes between commits, commit and working tree, etc. |
Branching and Merging
| Command | Description |
|---|---|
git branch | List all local branches |
git branch -a | List all branches (local and remote) |
git branch <branch-name> | Create a new branch |
git checkout <branch-name> | Switch to specified branch |
git checkout -b <branch-name> | Create and switch to a new branch |
git merge <branch-name> | Merge specified branch into current branch |
git branch -d <branch-name> | Delete a branch |
Remote Repositories
| Command | Description |
|---|---|
git remote -v | List all remote repositories |
git remote add <name> <url> | Add a new remote repository |
git push <remote> <branch> | Push branch to remote repository |
git pull <remote> <branch> | Pull changes from remote repository |
git fetch <remote> | Download objects and refs from remote |
Advanced Operations
| Command | Description |
|---|---|
git stash | Stash changes in working directory |
git stash pop | Apply stashed changes and remove from stash |
git reset --hard <commit> | Reset working directory to specified commit |
git rebase <branch> | Reapply commits on top of another base |
git cherry-pick <commit> | Apply changes from specific commit |
git tag <name> | Create a tag |
Configuration
| Command | Description |
|---|---|
git config --global user.name "Name" | Set global username |
git config --global user.email "email" | Set global email |
git config --list | List all configuration |
git config --global alias.<alias-name> <git-command> | Create command alias |
Common Workflows
Feature Branch Workflow
- Create a feature branch:
git checkout -b feature-name - Make changes and commit:
git add .andgit commit -m "message" - Push to remote:
git push origin feature-name - Create pull request (via web interface)
- After review, merge to main branch
Fixing Mistakes
- Amend last commit:
git commit --amend - Undo last commit (keeping changes):
git reset HEAD~1 - Discard all local changes:
git reset --hard - Discard changes to a file:
git checkout -- <file>
3.1 - GitLab
4 - Docker Cheat Sheet
Docker Cheat Sheet
Các lệnh cơ bản
Quản lý Images
Cài đặt Docker
Ubuntu
4.1 - Docker Cheat Sheet
Docker Cheat Sheet
Các lệnh cơ bản
Quản lý Images
Cài đặt Docker
Ubuntu
4.2 - Docker Architecture
Docker uses a client-server architecture with several key components working together to build, run, and distribute containerized applications.
Architecture Overview
flowchart TD
    Client[Docker CLI] -->|commands| Daemon[Docker Daemon]
    Daemon -->|manages| Images[Images]
    Daemon -->|manages| Containers[Containers]
    Daemon -->|manages| Networks[Networks]
    Daemon -->|manages| Volumes[Volumes]
    Images -->|create| Containers
    Registry[Registry] <-->|push/pull| Images

    style Client fill:#f9d77e,stroke:#333,stroke-width:2px
    style Daemon fill:#78a9ff,stroke:#333,stroke-width:2px
    style Images fill:#ffe6cc,stroke:#333,stroke-width:2px
    style Containers fill:#d5e8d4,stroke:#333,stroke-width:2px
    style Networks fill:#e1d5e7,stroke:#333,stroke-width:2px
    style Volumes fill:#fff2cc,stroke:#333,stroke-width:2px
    style Registry fill:#f8cecc,stroke:#333,stroke-width:2px
This simplified overview shows the core components of Docker’s architecture:
- Docker CLI: The command-line interface users interact with
- Docker Daemon: The background service managing all Docker objects
- Images: Read-only templates used to create containers
- Containers: Running instances of Docker images
- Networks: Allow containers to communicate with each other
- Volumes: Persistent data storage for containers
- Registry: Stores and distributes Docker images
Architecture Diagram
graph TD
    subgraph "Docker Host"
        A[Docker Daemon] --- B[Container Runtime]
        A --- C[Images]
        A --- D[Volumes]
        A --- E[Networks]

        B --- F[Container 1]
        B --- G[Container 2]
        B --- H[Container 3]

        F --- I[App Process]
        G --- J[App Process]
        H --- K[App Process]
    end

    L[Docker Client] --- A
    A --- M[Registry]

    classDef container fill:#66aa66,stroke:#333,stroke-width:2px;
    classDef daemon fill:#4477aa,stroke:#333,stroke-width:2px;
    classDef client fill:#aa6644,stroke:#333,stroke-width:2px;
    classDef registry fill:#aa66aa,stroke:#333,stroke-width:2px;

    class A daemon;
    class F,G,H container;
    class L client;
    class M registry;
Key Components
Docker Client
The Docker client (docker) is the primary way users interact with Docker. When you use commands like docker run, the client sends these commands to the Docker daemon, which carries them out.
Docker Daemon
The Docker daemon (dockerd) listens for Docker API requests and manages Docker objects such as images, containers, networks, and volumes. A daemon can also communicate with other daemons to manage Docker services.
Container Runtime
The container runtime is the component that actually runs containers. Docker uses containerd as its container runtime, which handles lower-level container execution.
Images
A Docker image is a read-only template with instructions for creating a Docker container. Often, an image is based on another image, with some additional customization.
Containers
A container is a runnable instance of an image. You can create, start, stop, move, or delete a container using the Docker API or CLI.
Docker Registry
A Docker registry stores Docker images. Docker Hub is a public registry that anyone can use, and Docker is configured to look for images on Docker Hub by default. You can also run your own private registry.
Volumes and Networks
Docker provides persistent data storage through volumes and networking capabilities through network drivers.
5 - PostgreSQL
6 - Development
6.1 - Development Container
Development Container for VDAT Docs
This documentation site supports development using VS Code Development Containers, which provides a consistent, isolated environment for editing and previewing the documentation.
Prerequisites
- Docker
- Visual Studio Code
- Remote - Containers extension for VS Code
Getting Started
Clone the repository:
git clone https://gitlab.com/vdat/docs.git
cd docs
Open the project in VS Code:
code .When prompted, click “Reopen in Container” or use the command palette (F1) and select “Remote-Containers: Reopen in Container”.
VS Code will build the dev container (this may take a few minutes the first time).
Once the container is built and running, you can start the Hugo server:
hugo server --bind 0.0.0.0Access the live preview at http://localhost:1313
Features
The development container includes:
- Hugo (Extended Edition)
- Node.js and NPM (for Docsy dependencies)
- Git
- Pandoc for document conversions
- PlantUML and Graphviz for diagrams
- VS Code extensions for Markdown, YAML, and Hugo
- PostCSS and Autoprefixer for CSS processing
Common Tasks
Adding New Content
# Create a new page in a section
hugo new content/en/docs/section/page-name.md
Building the Site
# Development build with live reload
hugo server --bind 0.0.0.0

# Production build
hugo
Installing NPM Dependencies
npm install
Troubleshooting
If you encounter issues with the dev container:
- Rebuild the container using VS Code’s command palette: “Remote-Containers: Rebuild Container”
- Check Docker Desktop to ensure the container is running
- Verify port 1313 is forwarded correctly (check VS Code’s “Ports” tab in the Remote Explorer)
6.2 - OpenAPI Specification
OpenAPI Specification
7 - Go Programming
This section contains documentation related to Go programming language, including tutorials, best practices, and code examples.
Overview
Go (or Golang) is an open source programming language designed for building simple, fast, and reliable software. This section provides resources to help you learn and use Go effectively in your projects.
8 - Data Platform
VDAT Data Platform
The VDAT Data Platform provides an end-to-end solution for healthcare data management, analytics, and insights generation. Our platform encompasses the full data lifecycle:
- Data Collection & Integration - Secure capture and standardization of healthcare data
- Data Visualization - Interactive dashboards and visual analytics tools
- Data Governance - Comprehensive frameworks for security, privacy, and compliance
- Machine Learning - Advanced algorithms for predictive modeling and insights
- Medical Imaging - Specialized tools for medical imaging data processing and analysis
This unified approach ensures seamless data flow while maintaining the highest standards of data quality, security, and accessibility for authorized healthcare stakeholders.
8.1 - Data Collection & Integration
8.2 - Data Integration
8.3 - Data Visualization & Analytics
Data Visualization
The VDAT data visualization capabilities enable healthcare professionals and researchers to transform complex health data into intuitive visual representations.
Features
- Interactive Dashboards - Customizable views of key metrics and trends
- Clinical Visualizations - Specialized visualizations for clinical data
- Real-time Analytics - Live data streaming and visualization
- Comparative Analysis - Tools for benchmarking and trend analysis
- Custom Reporting - Configurable report generation for stakeholders
8.4 - Data Governance & Compliance
Data Governance
VDAT’s data governance framework ensures that healthcare data is managed securely, ethically, and in compliance with relevant regulations throughout its lifecycle.
Components
- Access Control - Role-based permission systems and authentication protocols
- Data Privacy - De-identification and anonymization methodologies
- Audit Trails - Comprehensive logging and monitoring of data access
- Regulatory Compliance - Frameworks for HIPAA, GDPR, and other healthcare regulations
- Data Quality Management - Procedures for ensuring accuracy and consistency
- Metadata Management - Standardized data cataloging and documentation
8.5 - Statistical Learning Models
Statistical Learning Models
VDAT’s machine learning capabilities apply advanced computational techniques to extract meaningful patterns and predictions from healthcare data.
Methodologies
- Supervised Learning - Classification and regression models for clinical prediction
- Unsupervised Learning - Clustering and dimensionality reduction for pattern discovery
- Deep Learning - Neural network architectures for complex healthcare data analysis
- Natural Language Processing - Text analysis for clinical notes and medical literature
- Time Series Analysis - Sequential data modeling for patient trajectories
- Explainable AI - Transparent models with interpretable results for clinical decision support
8.6 - Medical Imaging
Medical Imaging
VDAT provides comprehensive solutions for handling medical imaging data across various modalities, supporting both clinical and research applications.
Capabilities
- Multi-modality Support - Compatible with DICOM, NIfTI, and other imaging formats
- Image Processing - Advanced filtering, registration, and segmentation tools
- AI-assisted Analysis - Automated detection and quantification algorithms
- 3D Visualization - Interactive three-dimensional rendering of volumetric data
- Annotation Tools - Collaborative labeling and region-of-interest marking
- Integration with PACS - Seamless connection with existing clinical imaging systems
9 - Security & Compliance
Bảo mật và xác thực
Phần này bao gồm các tài liệu về bảo mật, xác thực và phân quyền trong hệ thống.
9.1 - Basic Security Concepts: Authentication
Overview
This document covers the basic security concepts and authentication methods used in web applications.
Authentication Methods
| Method | Description | Use Cases |
|---|---|---|
| Basic Auth | Simple username/password authentication sent in HTTP headers | Development environments, simple APIs |
| JWT Token | JSON Web Tokens for stateless authentication | Modern web applications, microservices |
| OAuth2 | Authorization framework that enables third-party applications to obtain limited access | Social logins, API authorization |
Basic Authentication
Basic Authentication is a simple authentication scheme built into the HTTP protocol. The client sends HTTP requests with the Authorization header that contains the word Basic followed by a space and a base64-encoded string username:password.
9.1.1 - JSON Web Token (JWT)
JSON Web Tokens (JWT) provide a compact, URL-safe means of representing claims securely between two parties. They are commonly used for authentication and authorization in web applications.
What is JWT?
JSON Web Token (JWT) is an open standard (RFC 7519) that defines a compact and self-contained way for securely transmitting information between parties as a JSON object. This information can be verified and trusted because it is digitally signed.
JWTs can be:
- Signed using a secret (with the HMAC algorithm) or a public/private key pair (RSA or ECDSA)
- Encrypted to also provide secrecy between parties
JWT Structure
A JWT consists of three parts separated by dots (.):
xxxxx.yyyyy.zzzzz
- Header (xxxxx): Contains token type and signing algorithm
- Payload (yyyyy): Contains claims (user data and metadata)
- Signature (zzzzz): Ensures the token hasn’t been altered
JWT Token Structure Visualization
graph LR
    A[JWT Token] --> B[Header]
    A --> C[Payload]
    A --> D[Signature]

    B --> B1[Base64Url Encoded]
    C --> C1[Base64Url Encoded]

    B1 --> E["{
        alg: 'HS256',
        typ: 'JWT'
    }"]

    C1 --> F["{
        sub: '1234567890',
        name: 'John Doe',
        iat: 1516239022,
        exp: 1516242622
    }"]

    D --> G["HMACSHA256(
        base64UrlEncode(header) + '.' +
        base64UrlEncode(payload),
        secret)"]
How JWT Works
JWT authentication follows a simple flow:
- User logs in with credentials
- Server validates credentials and generates a JWT
- JWT is returned to the client
- Client stores the JWT (typically in local storage or a cookie)
- Client sends the JWT with subsequent requests
- Server validates the JWT signature and processes the request
JWT Authentication Flow
sequenceDiagram
    participant User
    participant Client
    participant Server

    User->>Client: Enter credentials
    Client->>Server: Authentication request
    Note right of Server: Validate credentials
    Server->>Server: Generate JWT with payload and signature
    Server->>Client: Return JWT
    Note left of Client: Store JWT

    loop For each protected request
        Client->>Server: Request with JWT in Authorization header
        Note right of Server: Validate JWT signature
        Note right of Server: Check expiration
        Server->>Client: Protected resource/response
    end
JWT Claims
Claims are statements about an entity (typically the user) and additional metadata. There are three types of claims:
Registered Claims: Predefined claims providing a set of useful, interoperable claims
iss(issuer)sub(subject)aud(audience)exp(expiration time)nbf(not before)iat(issued at)jti(JWT ID)
Public Claims: Custom claims defined by those using JWTs
- Should be registered in the IANA JSON Web Token Registry or named using a collision-resistant name
Private Claims: Custom claims created to share information between parties
JWT Implementation Example
Here’s a simplified example of generating and validating a JWT:
Server-side: Generating a JWT (Node.js)
const jwt = require('jsonwebtoken');

// User authentication function
function authenticate(username, password) {
  // Validate user credentials (simplified)
  if (isValidUser(username, password)) {
    // Create token payload
    const payload = {
      sub: getUserId(username),
      name: username,
      role: getUserRole(username),
      iat: Math.floor(Date.now() / 1000),
      exp: Math.floor(Date.now() / 1000) + (60 * 60) // 1 hour expiration
    };

    // Generate and sign token
    const token = jwt.sign(payload, process.env.JWT_SECRET);
    return token;
  }
  throw new Error('Authentication failed');
}
Server-side: Validating a JWT (Node.js)
const jwt = require('jsonwebtoken');

// Middleware to validate JWT
function verifyToken(req, res, next) {
  // Get auth header value
  const bearerHeader = req.headers['authorization'];

  if (bearerHeader) {
    // Extract token from "Bearer <token>"
    const token = bearerHeader.split(' ')[1];

    jwt.verify(token, process.env.JWT_SECRET, (err, decoded) => {
      if (err) {
        return res.status(403).json({ message: 'Invalid or expired token' });
      }

      // Add decoded user info to request object
      req.user = decoded;
      next();
    });
  } else {
    res.status(401).json({ message: 'Access denied. No token provided.' });
  }
}
JWT Storage Security Diagram
graph TD
    A[JWT Storage Options] --> B[Browser Storage]
    A --> C[HTTP Only Cookie]

    B --> D[localStorage]
    B --> E[sessionStorage]
    B --> F[Memory Variable]

    D --> G[Pros: Simple, Persists]
    D --> H[Cons: XSS Vulnerable]

    E --> I[Pros: Session-bound]
    E --> J[Cons: XSS Vulnerable]

    F --> K[Pros: Not accessible via XSS]
    F --> L[Cons: Lost on refresh]

    C --> M[Pros: XSS Protected, CSRF can be mitigated]
    C --> N[Cons: Server config required]

    style C fill:#c9e7f9
    style M fill:#c9f9d9
Best Practices for JWT
Use HTTPS: Always transmit JWTs over HTTPS to prevent token theft through network eavesdropping
Set Proper Expiration: Use short expiration times and implement token refresh
graph LR
    A[Token Types] --> B[Access Token]
    A --> C[Refresh Token]
    B --> D[Short lived: 15min - 1hr]
    C --> E[Longer lived: days/weeks]
    B --> F[Frequent validation]
    C --> G[Stored securely server-side]
Validate All Claims: Check issuer, audience, expiration, and all other relevant claims
Keep Tokens Small: Include only necessary data in the payload to maintain performance
Secure Storage: Store tokens securely, preferably in HttpOnly cookies for web applications
Implement Token Revocation: Have a strategy for invalidating tokens when needed (logout, password change)
Use Strong Keys: Use strong, randomly generated secrets for signing tokens
JWT vs Session Authentication
graph TB
    subgraph "JWT Authentication"
        A1[Client] -->|1. Login| B1[Server]
        B1 -->|2. JWT Token| A1
        A1 -->|3. Request with JWT| B1
        B1 -->|4. Validate JWT & Respond| A1
    end

    subgraph "Session Authentication"
        A2[Client] -->|1. Login| B2[Server]
        B2 -->|2. Session ID Cookie| A2
        A2 -->|3. Request with Cookie| B2
        B2 -->|4. Lookup Session & Respond| B2
    end

    C[Comparison]
    C --> D[JWT: Stateless, no session storage]
    C --> E[Session: Stateful, session storage required]
    C --> F[JWT: Larger request size]
    C --> G[Session: Smaller request size]
    C --> H[JWT: Decentralized validation possible]
    C --> I[Session: Centralized validation required]
Common JWT Security Vulnerabilities
None Algorithm Attack: Ensure your JWT library rejects tokens with the “none” algorithm
Algorithm Confusion: Ensure proper algorithm verification is implemented
Missing Signature Validation: Always validate signatures, never trust just the presence of a token
Weak Secrets: Use strong, random secrets or keys for token signing
Token Sidejacking: Implement additional security measures to prevent token theft
Further Reading
- JWT.io - Official JWT website with interactive debugger
- RFC 7519 - The JWT specification
- OWASP JWT Cheat Sheet
9.1.2 - OAuth2
OAuth2 và OpenID Connect
OAuth2 là một giao thức ủy quyền cho phép các ứng dụng bên thứ ba có thể truy cập tài nguyên của người dùng mà không cần biết thông tin đăng nhập của họ. OpenID Connect là một lớp xác thực được xây dựng trên OAuth2, cung cấp thêm thông tin về người dùng.
Luồng xác thực OAuth2

Hệ thống sử dụng OAuth2 và OpenID Connect để xác thực và phân quyền giữa các dịch vụ. Mỗi dịch vụ tự quản lý phân quyền và sử dụng IAM (Identity Access Management) để hỗ trợ xác thực người dùng.
Chọn luồng xác thực OAuth2
xem phần đề để chọn luồng xác thực phù hợp với ứng dụng hoặc dịch vụ của mình.
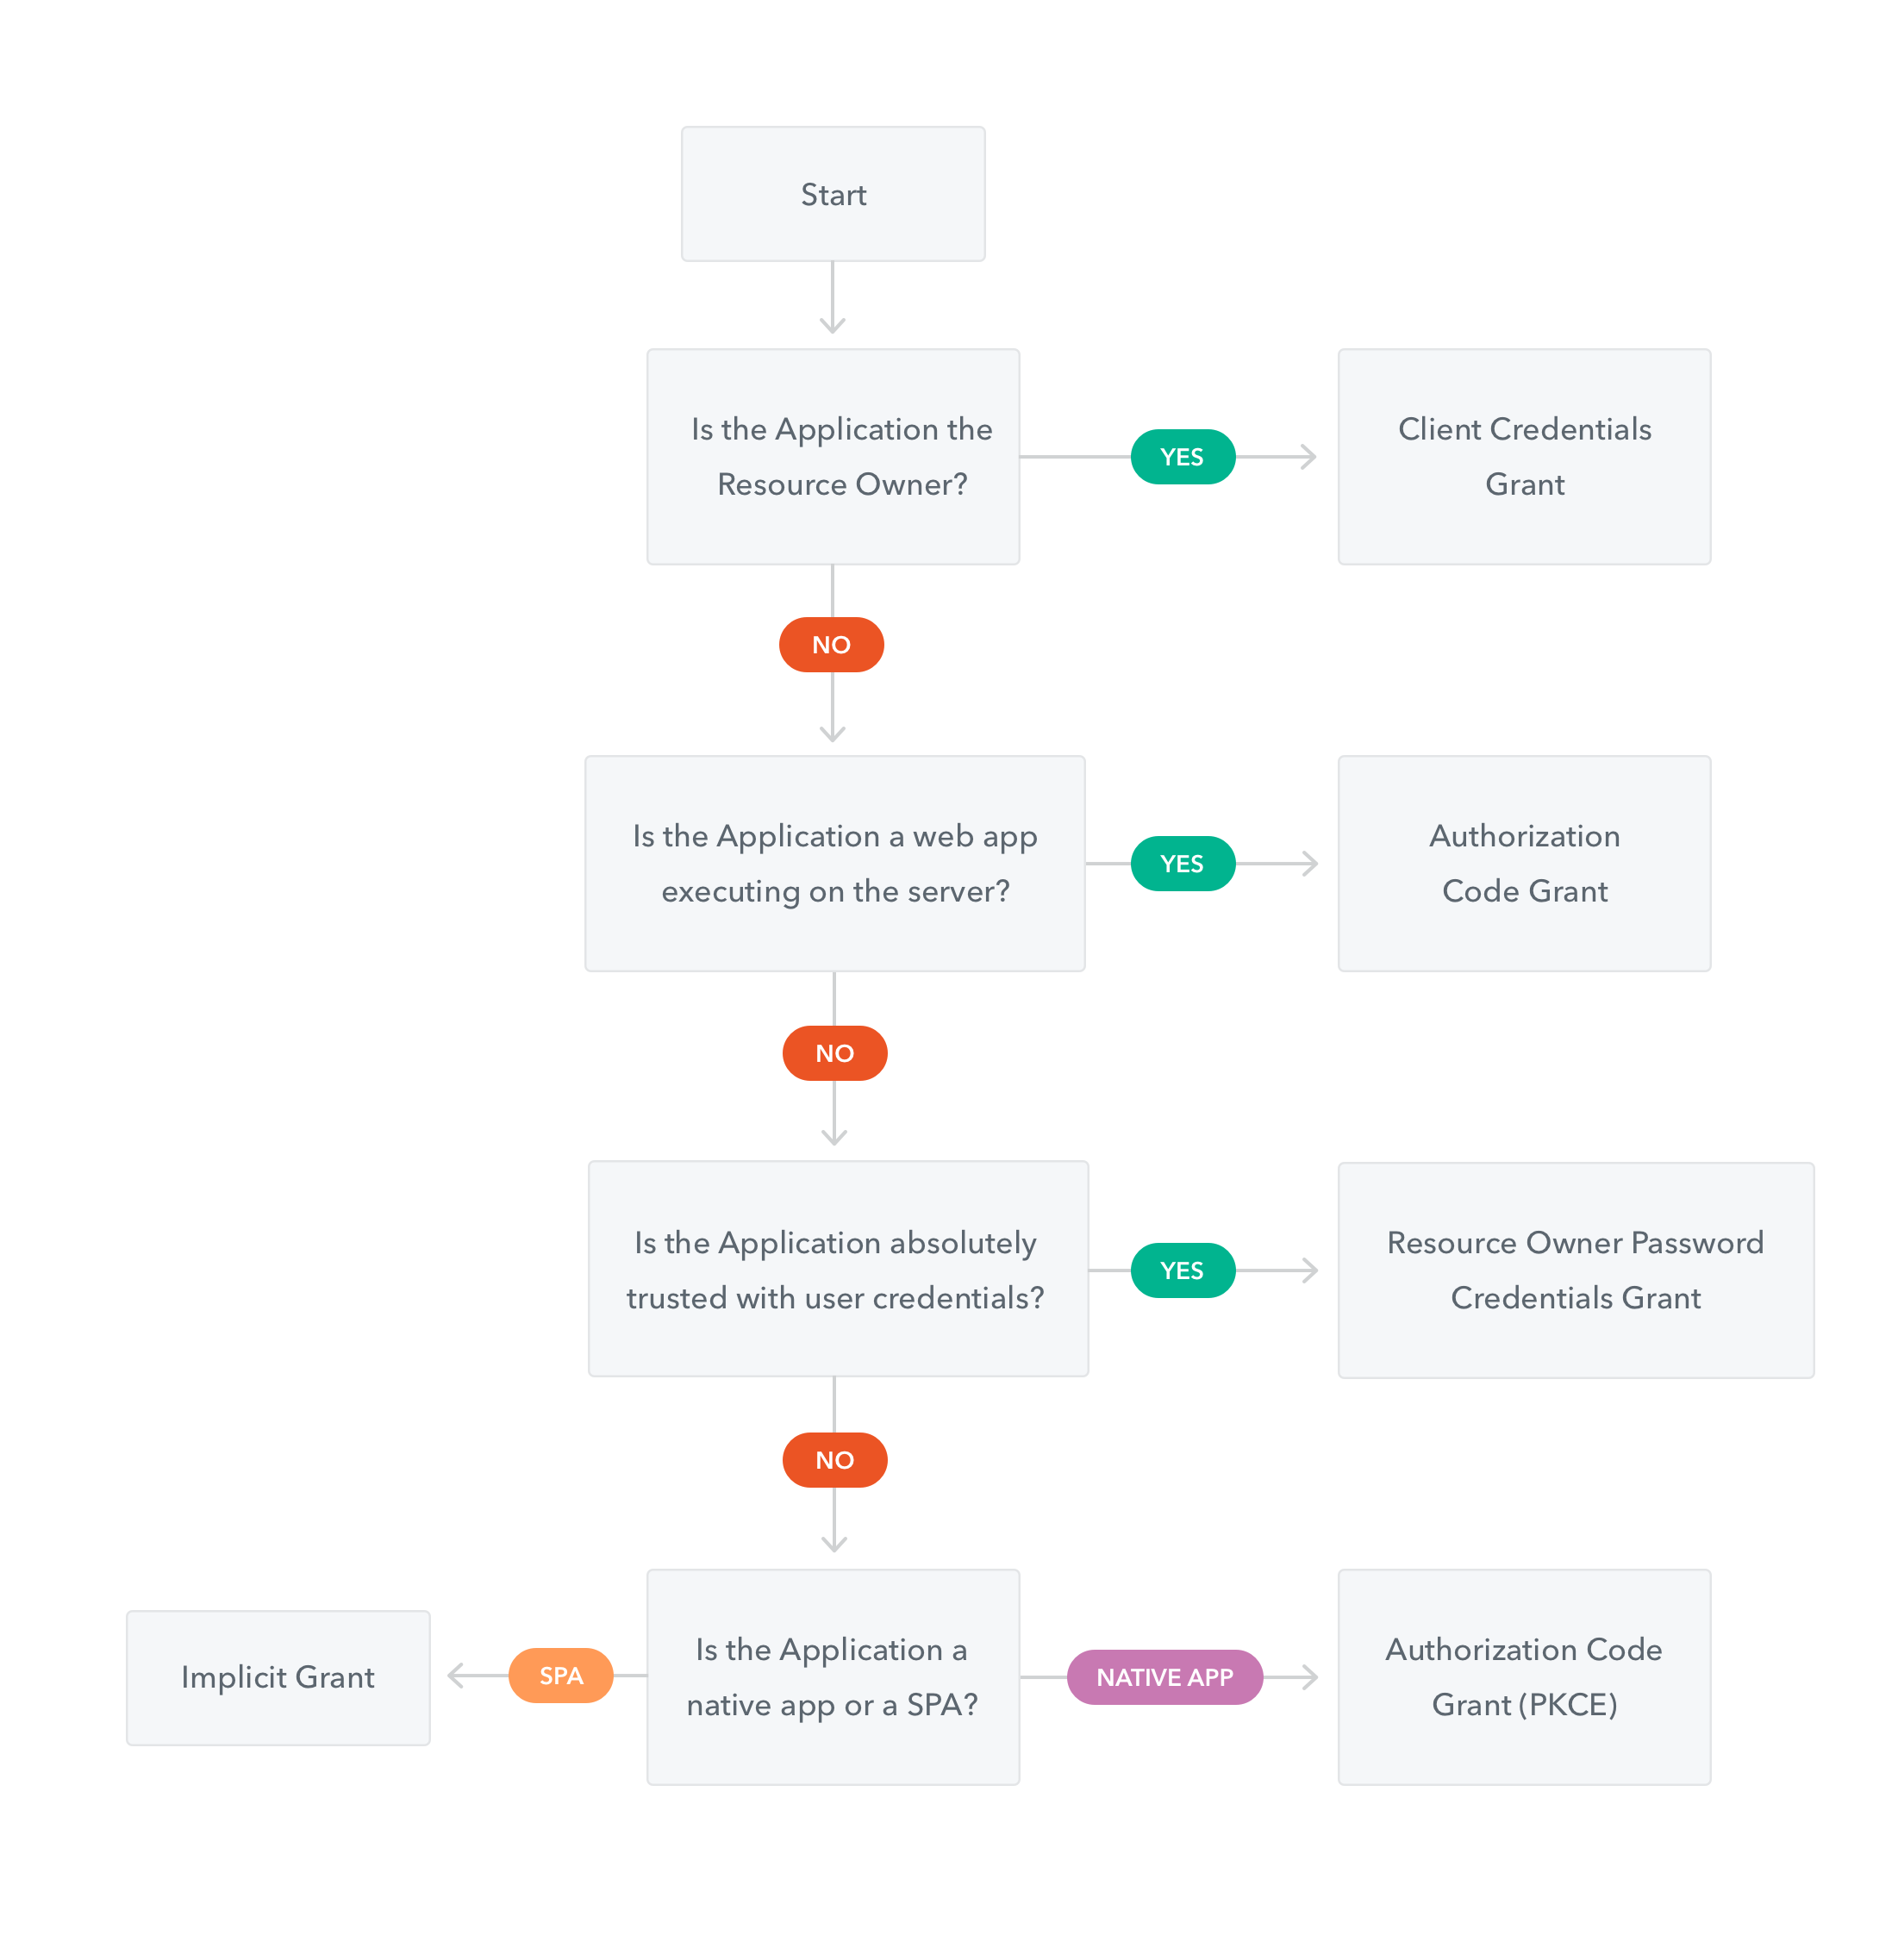
tham khảo: https://auth0.com/docs/api-auth/which-oauth-flow-to-use
OpenID Configuration
Xem phần này để biết cấu hình kết nối với Identity Provider để thực hiện xác thực v.v.
{
    issuer: "https://accounts.vdatlab.com/auth/realms/vdatlab.com",
    authorization_endpoint: "https://accounts.vdatlab.com/auth/realms/vdatlab.com/protocol/openid-connect/auth",
    token_endpoint: "https://accounts.vdatlab.com/auth/realms/vdatlab.com/protocol/openid-connect/token",
    token_introspection_endpoint: "https://accounts.vdatlab.com/auth/realms/vdatlab.com/protocol/openid-connect/token/introspect",
    userinfo_endpoint: "https://accounts.vdatlab.com/auth/realms/vdatlab.com/protocol/openid-connect/userinfo",
    end_session_endpoint: "https://accounts.vdatlab.com/auth/realms/vdatlab.com/protocol/openid-connect/logout",
    jwks_uri: "https://accounts.vdatlab.com/auth/realms/vdatlab.com/protocol/openid-connect/certs",
    check_session_iframe: "https://accounts.vdatlab.com/auth/realms/vdatlab.com/protocol/openid-connect/login-status-iframe.html",
    grant_types_supported: [
        "authorization_code",
        "implicit",
        "refresh_token",
        "password",
        "client_credentials"
    ],
    response_types_supported: [
        "code",
        "none",
        "id_token",
        "token",
        "id_token token",
        "code id_token",
        "code token",
        "code id_token token"
    ],
    ...
}
cấu hình đầy đủ: https://accounts.vdatlab.com/auth/realms/vdatlab.com/.well-known/openid-configuration
Hướng dẫn cấu hình 1 số biến cho các flow cơ bản
Flow xử dụng (ví dụ trong Postman):
- đối với Web app =>
Implicit - đố i với service =>
Client Credentials
trong đó:
- đối với luồng Implicit: lấy thông tin
authorization_endpointtừ config vàclientId,callback_url,scopes/defaultClientScopestừ thông tin client - đối với luồng Client Credentials: thông tin
token_endpointtừ config vàclientId,scopes/defaultClientScopestừ thông tin client;client_secretđược cấp bởi admin
9.2 - Secret Management
9.2.1 - SOPS: Secrets OPerationS
SOPS (Secrets OPerationS)
SOPS là một công cụ mã nguồn mở được phát triển bởi Mozilla để mã hóa và quản lý các bí mật (secrets) trong tệp cấu hình và tệp văn bản.
Tính năng chính
- Mã hóa tệp: Mã hóa các giá trị trong tệp YAML, JSON, ENV, INI và binary
- Hỗ trợ nhiều phương thức mã hóa: AWS KMS, GCP KMS, Azure Key Vault, PGP
- Mã hóa có chọn lọc: Chỉ mã hóa các giá trị, giữ nguyên cấu trúc tệp
- Quản lý phiên bản: Theo dõi thay đổi với diff có thể đọc được
Lợi ích
- Lưu trữ bí mật an toàn trong hệ thống quản lý phiên bản
- Dễ dàng chia sẻ bí mật trong nhóm
- Tích hợp tốt với các công cụ CI/CD và GitOps
- Hỗ trợ nhiều định dạng tệp phổ biến
9.3 - VPN
9.3.1 - Tailscale
Tailscale
Installation
brew install tailscale
Configuration
tailscale up
9.4 - Zero Trust Network Architecture (ZTNA)
10 - Operations
10.1 - Ansible
Ansible
Ansible là một công cụ tự động hóa IT mã nguồn mở, giúp quản lý cấu hình, triển khai ứng dụng và điều phối nhiệm vụ.
Tính năng chính
- Agentless: Không yêu cầu cài đặt agent trên các máy đích
- Declarative: Sử dụng YAML để mô tả trạng thái mong muốn
- Idempotent: Có thể chạy nhiều lần mà không gây ra tác dụng phụ
- Extensible: Dễ dàng mở rộng với modules và plugins
Playbooks
Playbooks là tệp YAML định nghĩa các nhiệm vụ tự động hóa trong Ansible.
Inventory
Inventory là danh sách các máy chủ mà Ansible quản lý, có thể được nhóm và phân cấp.
10.2 - Kubernetes
Overview
Kubernetes is an open-source container orchestration platform for automating deployment, scaling, and management of containerized applications.
Basic Concepts
| Concept | Description |
|---|---|
| Pod | Smallest deployable unit that can contain one or more containers |
| Node | Worker machine in the Kubernetes cluster |
| Cluster | Set of nodes that run containerized applications |
| Deployment | Manages the desired state for Pods and ReplicaSets |
| Service | Defines a logical set of Pods and a policy to access them |
| Namespace | Virtual cluster within a physical cluster |
Common Commands
| Command | Description |
|---|---|
kubectl get pods | List all pods in the current namespace |
kubectl apply -f file.yaml | Create or update resources from a file |
kubectl describe pod <pod-name> | Show detailed information about a pod |
kubectl logs <pod-name> | Print the logs from a container in a pod |
kubectl exec -it <pod-name> -- /bin/bash | Execute a command in a container |
10.2.1 - Port Forward Kubernetes
Syntax
NS=<namespace>; kubectl -n $NS port-forward $(kubectl -n $NS get pods -l app=<[production,staging,production-postgres,staging-postgres]> | awk 'NR==2{print$1}') <local_port>:<container_port>
- Ví dụ tạo kết nối đến DB staging của Collector
điền NS=collector-8148254 APP=staging-postgres
lệnh: NS=collector-8148254 APP=staging-postgres; kubectl -n $NS port-forward $(kubectl -n $NS get pods -l app=$APP | awk 'NR==2{print$1}') 5432:5432
- Tạo kết nối đế n ứng dụng collector staging để truy cập bằng localhost:8080
lệnh: NS=collector-8148254 APP=staging; kubectl -n $NS port-forward $(kubectl -n $NS get pods -l app=$APP | awk 'NR==2{print$1}') 8080:5000
10.3 - OpenTelemetry
OpenTelemetry
OpenTelemetry (OTel) là một framework mã nguồn mở để thu thập dữ liệu telemetry từ các ứng dụng và dịch vụ. OTel cung cấp các API, thư viện, agent và công cụ thu thập để tạo, quản lý và xuất dữ liệu telemetry (logs, metrics, và traces) đến các backend phân tích.
Thành phần chính
- Traces: Theo dõi luồng yêu cầu qua các dịch vụ
- Metrics: Thu thập dữ liệu số liệu về hiệu suất hệ thống
- Logs: Ghi lại các sự kiện xảy ra trong hệ thống
Lợi ích
- Chuẩn hóa việc thu thập dữ liệu telemetry
- Giảm thiểu vendor lock-in
- Tích hợp dễ dàng với nhiều backend phân tích
- Hỗ trợ đa ngôn ngữ lập trình
10.4 - GitOps
Example workflow
sequenceDiagram
    participant Dev as Developer
    participant GL as GitLab
    participant TFC as Terraform Cloud
    participant CF as Cloudflare

    Dev->>GL: Update members.yaml
    GL->>GL: Merge to master
    GL->>TFC: Trigger pipeline
    TFC->>CF: Update Zero Trust access permissions
    Note over CF: Application access policies updated
In this example, a developer updates the members.yaml file,
which contains the list of members who have access to the site.
Another developer review then merges the changes to the master branch,
triggering a pipeline in Terraform Cloud.
The pipeline updates the Zero Trust access permissions in Cloudflare,
updating the application access policies.